
Installing Home Assistant OS onto an Intel NUC or other PC
Installing the Home Assistant Operating System onto an old PC or Intel NUC is a great way to get a powerful home automation system.
Here is how you go about installing the Home Assistant OS onto an Intel NUC, but the instructions are the same for any x86 based PC. You'll need two USB drives for this, with a decent storage capacity.
Firstly, download the latest Ubuntu LTS version and also download an application called Balena Etcher, which you will use to flash Ubuntu onto the USB drive.
Open Balena Etcher, and choose to flash the Ubuntu ISO image you just downloaded to your first USB drive.

Now go and download the latest Home Assistant Operating System version for x86 PCs from the Home Assistant website.
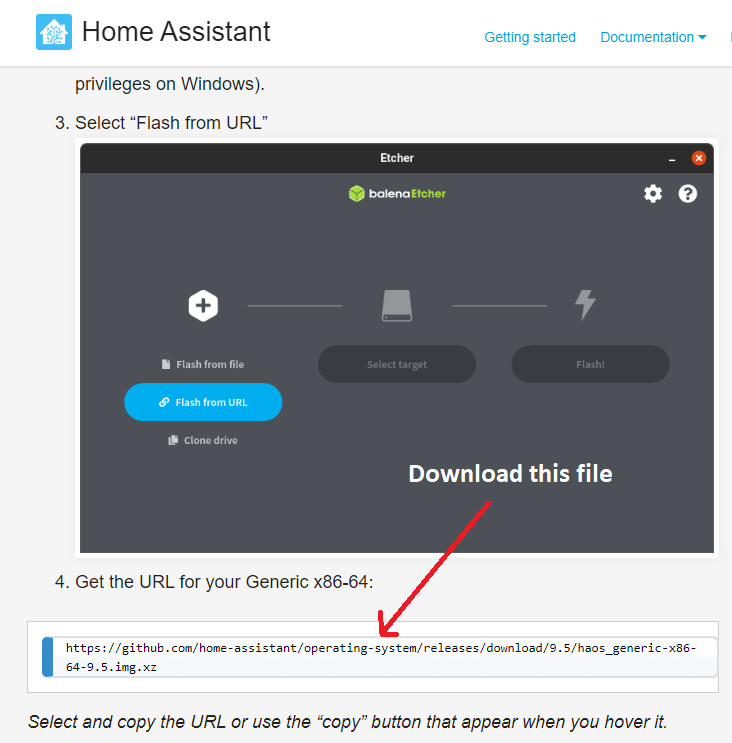
Copy the .img.xz file to your second USB stick. This stick should be formatted with a FAT file system, not NTFS.
Plug in your NUC PC or your old computer and boot it up. You'll need to make sure that you boot from the USB drive. Most BIOS's will let you choose what you boot from either in the BIOS itself or by pressing a key during the bootup sequence to show you the boot options.
Ubuntu should now boot up on your PC and when you're given the option, choose Try Ubuntu. This will load up Ubuntu from your USB key and not actually load anything from the computers hard disk.
Once you get to the Ubuntu desktop plug in your Second USB drive and open up a terminal window.
Now we're going to flash the internal hard disk of your old PC or NUC with the Home Assistant OS image that we downloaded onto our second USB drive.
Firstly, run the lsblk command in the terminal to list out all the hard drives that are attached to the computer. This should be both your USB keys and the internal hard disk.
In the left hand column of the lsblk output you'll see the names of the physical disks, and on the right hand side you'll see the mount points.
On my screen you can see the that my second USB stick is referred to as sdb with a mount point of /media/ubuntu/USBKey and the internal hard disk of my PC is nvme0n1. We want to write the Home Assistant image from the USB key to nvme0n1. The names of these may be different on your PC, so pay attention!

You can write the image using this command. You'll need to change some of these bits to match your own mount point and disk.
xz -dc /path/to/image.xz | dd of=/path/to/your/ssd bs=4M conv=fsyncOn my system the command is
xz -dc /media/ubuntu/USBKey/haos_generic-x86-64-9.5.img.xz | dd of=/nvme0n1 bs=4M conv=fsyncIf you get a permission denied error, go into Sudo mode by running this command
sudo suThe image should now copy across and once it's done you should be able to reboot the PC and see the Home Assistant OS has started!
You can now navigate to http://homeassistant.local:8123 or it's IP address and the 8123 port from another PC and finish setting up Home Assistant!