
Get notified when your Washing Machine has finished it's wash cycle using Smart Switches and Contact Sensors

I have a bad habit of forgetting that I've put clothes in the washing machine. The clothes have been known to stay in there for 24 hours after a cycle has run, and inevitably end up smelling like a wet dog when I eventually remember to take them out.
I decided to try and do something about this using a smart plug that measures the energy that is being consumed by the appliance that is plugged into it. I figured that I could look at the energy being consumed throughout the washing cycle and use that to figure out where in the cycle it was up to, and then send me a push notification to my phone when the machine was finished.
Unfortunately, the push notifications were often sent whilst I was upstairs working in my office, so I'd dismiss them and once again forget about them. To solve this problem I now change the colour of a LED strip on the stairwell near the washing machine to Green when it hasn't been emptied. We can now visually see that the washing machine needs to be emptied as we're walking down the stairs.
A door contact sensor mounted on the washing machine door tells Home Assistant if the machine has been emptied, and then sets the LED strip back to its normal warm white colour.
To make this automation work you’ll need the following:
A working Home Assistant installation
A smart plug, with power monitoring, connected to Home Assistant
Some smart lights paired with Home Assistant. I am using a Philips Hue LED strip.
A contact sensor (Door or Window sensor), mounted to the washing machine door.
The Home Assistant mobile application installed on your mobile phone
The Setup
To get started you need to plug the smart switch into the outlet and then plug the washing machine into it.
Important! Make sure that the smart plug is rated for enough current (Amps) to power the washing machine! If you overload the switch there is a risk it could catch fire!
Once it's all plugged in, you need to configure the smart switch to connect to your wireless network by following the instructions that came with the device. Once it's connected to your wireless network you should be able to add it to Home Assistant using the official Kasa Smart Plug integration.
Once it's connected to Home Assistant you should see the sensor entities for the current (in Amps) and consumption (in Watts). The sensor we will use to figure out what part of the cycle it is on is the Current Consumption sensor.
Once it is hooked up you can run your washing machine and look at the graph to see how many watts are being used at different parts of the cycle.

Screenshot of Smart Switch Entities in Home Assistant

Screenshot of smart switch current consumption readout.
I tend to use the same washing program each time, so the amount of power consumed throughout the cycle is consistent from wash to wash. But be aware that if you use different programs, especially ones that have a soak cycle in the middle, your washing machine automations may incorrectly assume the state.
Finally, you will need a door/window sensor mounted to the washing machine door and connected to Home Assistant. We will use this to determine if the washing machine has been emptied or not. If the door has been opened, we can assume that the clothes have been removed.


Screenshot showing door sensor in Home Assistant
Washing Machine States
I want to track three different states that the washing machine can be in:
Off
The machine is powered off
Running
The washing machine is washing the clothes
Unemptied
The washing machine has finished washing clothes and has not been emptied
To keep track of the state that the washing machine is in you will need to create a Dropdown Helper. The easiest way to configure an input select is via the user interface at Configuration -> Helpers. Click the add button and then choose the Dropdown option. Give it the name "Washing Machine Status" and add an option for each of the states above.

Screenshot of washing machine dropdown helper in Home Assistant
Now that you have the helper set up, you will need to configure some automations to change the state from one to another when it is switched on and finished.
The automations
I have three automations that change the drop-down input select sensor to the correct state.

Screenshot of three automations in Home Assistant which change the state of the washing machine helper
Let's take a look at these automations one by one.
Set Washing Machine Status to Running
The first automation will set the status dropdown helper to the Running state and send us a push notification telling us that the machine has started.
Trigger
The automation is triggered when the washing machine is drawing more than 1 watt of power for more than a minute. I use a numeric state trigger as that allows me to check if a value is above or below a certain threshold.
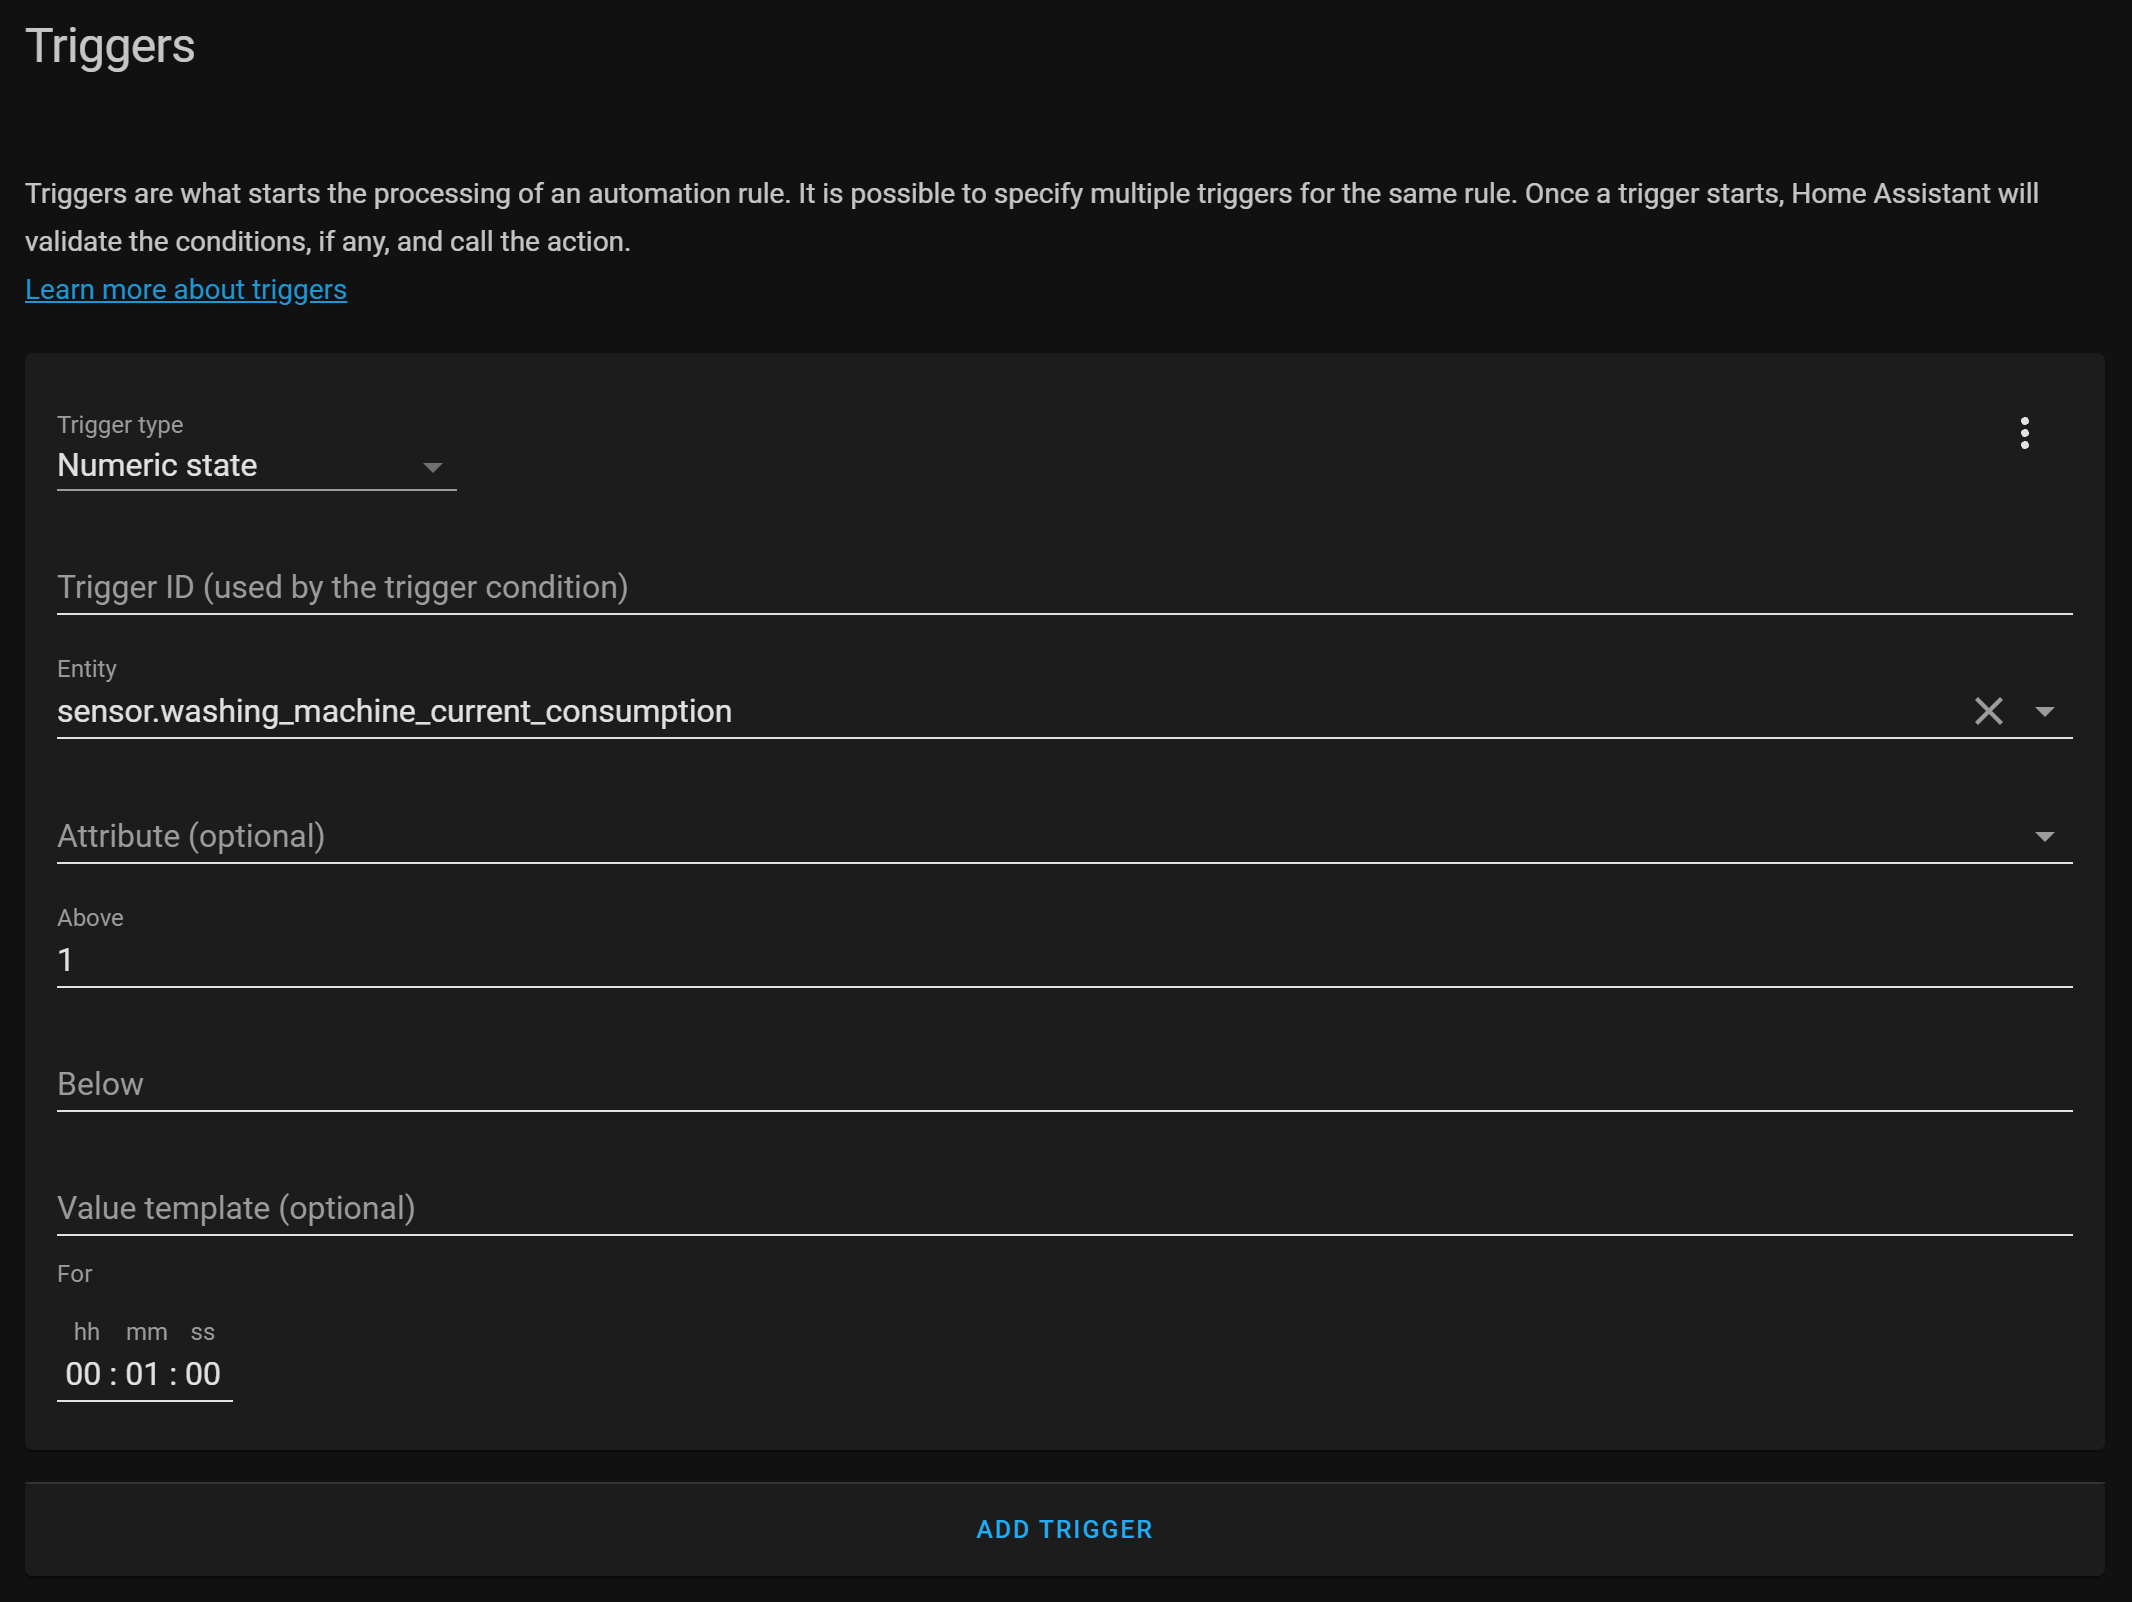
Screenshot showing the automation trigger
Here's the trigger block in YAML:
platform: numeric_state
entity_id: sensor.washing_machine_current_consumption
above: '1'
for: '00:01:00'
Condition
To prevent the washing machine from flipping between states whilst it's in a soak cycle or similar I use a condition to only set the state to Running if the previous state was set to Off. This is done with a state condition.

Screenshot showing state condition in Home Assistant
Or in YAML format:
condition: state
entity_id: input_select.washing_machine_status
state: 'Off'
Action
If the trigger and condition indicate that the washing machine has been switched on, we can send a push notification to our phone via the Home Assistant app and set the status to Running.
To send the push notification we will use the Call Service action to call the Notify service with a message to tell us the automation has started.

Screenshot showing the notification action in Home Assistant to send a message.
Then we use another Call Service action to call the input_select.select_option to change the helper to the Running state.

Screenshot showing the select_option service call in Home Assistant to change the helper to Running
Full automation in YAML
alias: 'Helper: Set Washing Machine Status to Running'
description: ''
trigger:
  - platform: numeric_state
    entity_id: sensor.washing_machine_current_consumption
    above: '1'
    for: '00:01:00'
condition:
  - condition: state
    entity_id: input_select.washing_machine_status
    state: 'Off'
action:
  - service: notify.mobile_app_alan_s_pixel_4
    data:
      message: 💚 Washing Machine has started
  - service: input_select.select_option
    data:
      option: Running
    target:
      entity_id: input_select.washing_machine_status
mode: single
Set Washing Machine Status to Unemptied
Once the washing machine has finished its cycle, we need to set the state to Unemptied and set the stairwell LED strip colour to green using another automation.
Trigger
This automation is triggered when the Washing Machine power consumption goes below 0.1 watt for a minute. I have found this works with the washing machine cycle that I mostly use, but you may have to look at using different values or triggers that work with your own washing machine. The power usage graphs that I showed you at the top of this post can help you find out what works for your machine washing cycle.
I use a numeric state trigger to check if the power usage has been below 0.1 watts for over a minute.

Screenshot of Home Assistant showing the numeric state automation trigger
The trigger in YAML format:
platform: numeric_state
entity_id: sensor.washing_machine_current_consumption
for: '00:01:00'
below: '0.1'
Conditions
I use a condition to ensure that the washing machine is only set to the Unemptied state if it has previously been running. If we did not have this condition, the washing machine would set itself to Unemptied as soon as I turned it on, as the idle power usage is the same before and after the cycle has been running.
For this I use a State condition that checks if the washing machine status is currently set to running.

Screenshot of Home Assistant showing the state condition
In YAML format:
condition: state
entity_id: input_select.washing_machine_status
state: Running
Action
This automation has three different actions.
Firstly, it sends me a push notification telling me that the washing machine is finished.

Screenshot of Home Assistant showing the push notification action
Then it sets the Input Select washing machine state helper to Unemptied using the Call Service action type and the Select Option service.

Screen
And finally, it sets the light to Green using the Light Turn On service with a 5-second transition to make it look pretty.
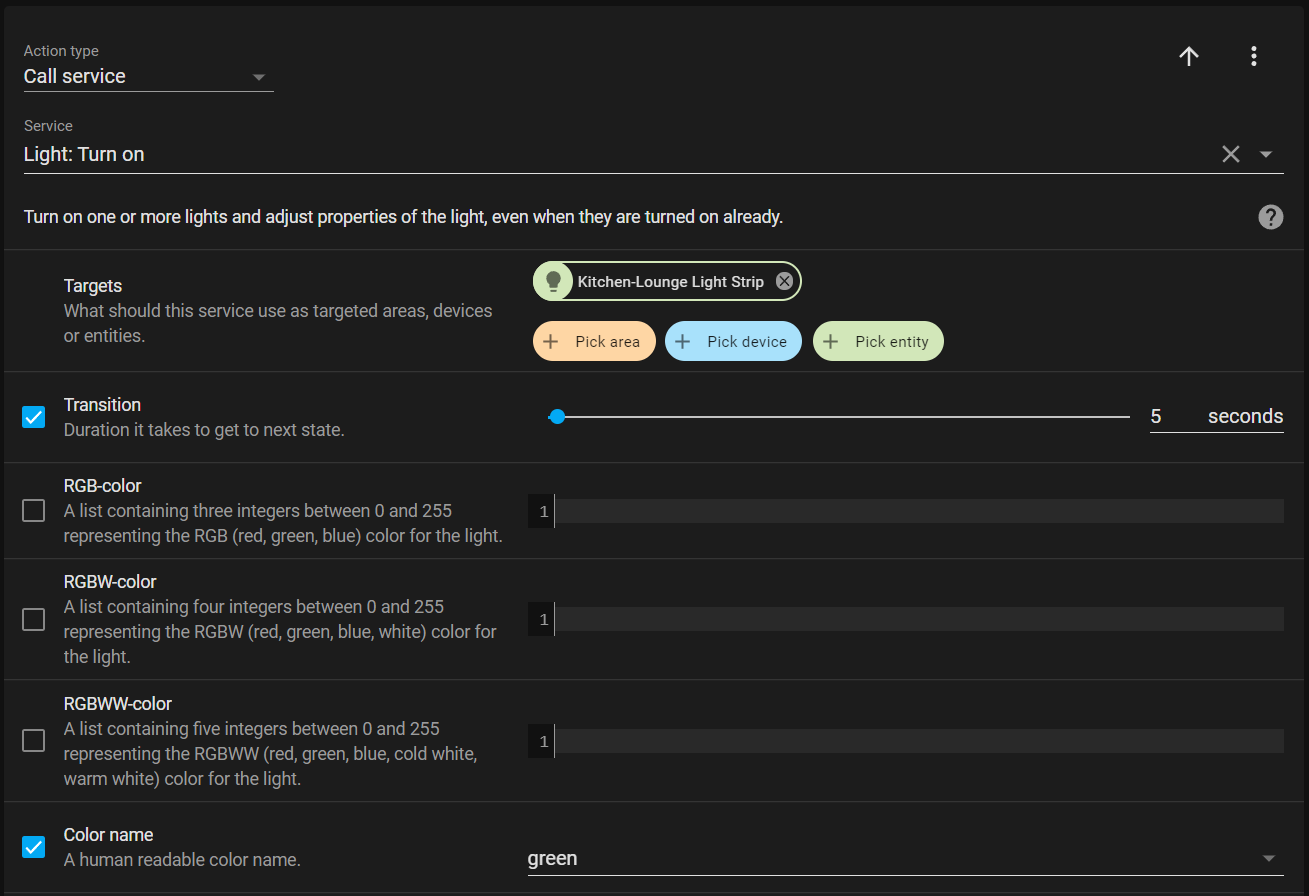
Screenshot of Home Assistant showing the Light Turn On Service
Full Automation in YAML
alias: 'Helper: Set Washing Machine Status to Unemptied'
description: ''
trigger:
  - platform: numeric_state
    entity_id: sensor.washing_machine_current_consumption
    for: '00:01:00'
    below: '0.1'
condition:
  - condition: state
    entity_id: input_select.washing_machine_status
    state: Running
action:
  - service: notify.mobile_app_alan_s_pixel_4
    data:
      message: 🏁 Washing machine is done
  - service: input_select.select_option
    data:
      option: Unemptied
    target:
      entity_id: input_select.washing_machine_status
  - service: light.turn_on
    target:
      entity_id: light.kitchen_lounge_light_strip
    data:
      color_name: green
      transition: 5
mode: single
Set Washing Machine Status to Done
There's one more automation that we need to create which sets the washing machine status to Off once the washing machine door has been opened. This is how we know if it has been unemptied or not. This same automation will also send us a push notification letting us know that someone has emptied the washing machine and also sets that LED light strip back to its normal colour.
Trigger
This automation is triggered when the washing machine door contact sensor goes from closed to open. This is done using a State automation trigger.

Screenshot of Home Assistant showing a state automation trigger for the washing machine door.
The trigger in YAML:
platform: state
entity_id: binary_sensor.washing_machine_contact_sensor_contact
from: 'off'
to: 'on'
Contact Sensors are really confusing, their state is set to on when the door is opened. You can validate this yourself by opening one of the doors and then looking at that contact sensor in the developer tools.
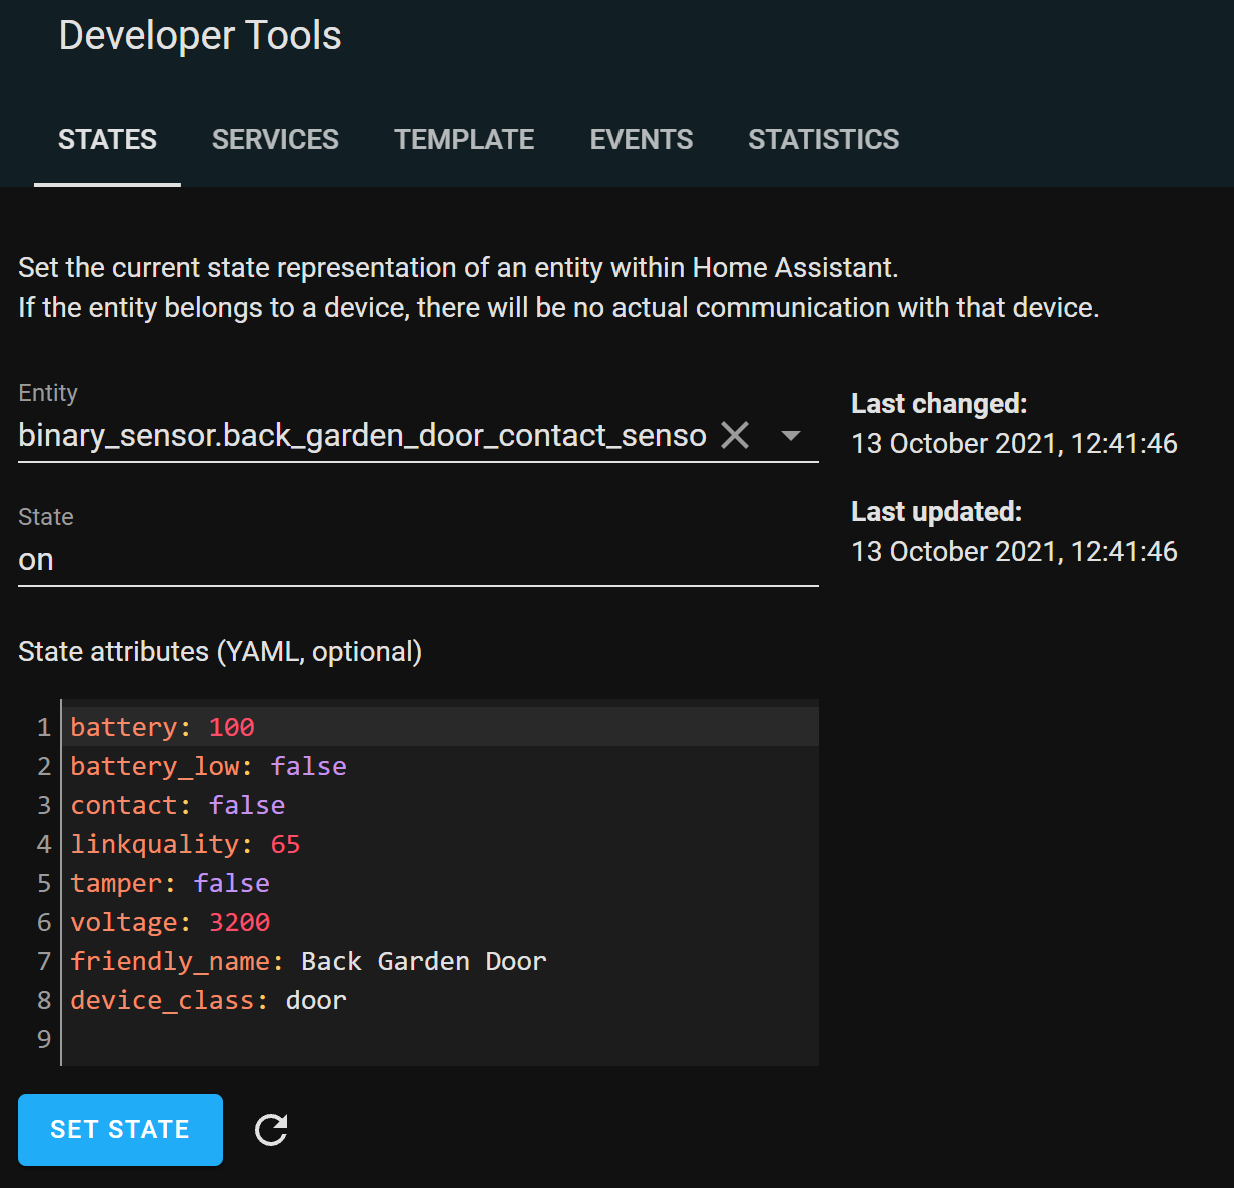
Sonoff Contact Sensor for an open door showing on state, but contact is false.
Condition
Like the other automations, we use a condition to make sure it only sets the state to Off if the machine was previously set to Unemptied. If we didn't do this, it might set the state to Off if we're opening the door to load the washing in the first place.
We use another state condition for this.

Screenshot of Home Assistant showing state condition that checks the washing machine state.
The condition in YAML:
condition: state
entity_id: input_select.washing_machine_status
state: Unemptied
Action
This automation has three different actions.
Firstly, it sends me a push notification telling me that the washing machine has been emptied.

Screenshot of Home Assistant showing the notification sent to my phone saying the washing machine has been emptied.
Then it sets the Input Select washing machine state helper to Off using the Call Service action type and the Select Option service.

Screenshot of Home Assistant showing the service call which changes the washing machine helper to Off
And finally, it uses the Call Service action to call the Light Turn On service and sets the light back to 375 mireds, which is the warm white light that I light to use around my house.

Screenshot of Home Assistant showing the light turn on service changing the lights back to warm white.
Full Automation in YAML
alias: 'Helper: Set Washing Machine Status to Off'
description: ''
trigger:
  - platform: state
    entity_id: binary_sensor.washing_machine_contact_sensor_contact
    from: 'off'
    to: 'on'
condition:
  - condition: state
    entity_id: input_select.washing_machine_status
    state: Unemptied
action:
  - service: notify.mobile_app_alan_s_pixel_4
    data:
      message: 👕 Washing machine was emptied
  - service: input_select.select_option
    data:
      option: 'Off'
    target:
      entity_id: input_select.washing_machine_status
  - service: light.turn_on
    data:
      transition: 2
      color_temp: 375
mode: single
Wrap up
These automations look pretty complicated when you see them fully documented in a blog post, but they're quite straight forward once you get the hang of them. A more visual explanation and demo of the automations can be seen in the videos below!
Using a smart plug to make any appliance a smart appliance.
Using a contact sensor on the washing machine to know when it has been emptied.