Making my own Bed Sensor
I recently created some “bed sensors” for my smart home that detect if one of us, or both of us, is in bed. I use a couple of pressure mats that detect when weight is applied to them, and stuck then under our mattress at around hip level and these tell my Home Assistant home automation platform if someone is lying on top of that part of the bed.

I originally thought that these would be more of a gimmick, than actually useful, but this turned out to be totally wrong! These now form an integral part of my smart home and I use them to not only trigger certain automations, but also prevent other automations from running if someone is in bed. For example, I don’t want the ceiling lights coming on in the bedroom if someone is in bed having a sleep!
This article shows you two ways I went about making one of these bed sensors. If you want to see the full end to end build process, check out my video about it!
Equipment Needed
The first thing you’ll need is a pressure mat, or pressure sensor. I used one I sourced from Amazon, and it costs less than $25. You can also buy them from here, and they're much cheaper. These are pretty basic things, and are essentially just pressure switches - if weight is applied to the mat, it completes the circuit. Make sure you get one with these exposed wires, so you can wire it up to the rest of the sensor.

You will need to identify which of the wires you need use in your sensor. Two of these wires loop together to make contact when you press down on the pad, and the other two… well I have NFI what they do.
Using a multimeter on continuity mode you can hold the wires to the two probes and press down on the mat. If you’ve got the right wires the meter should beep indicating that contact has been made when you press down. These are the wires you need to use, so make a note of them with some tape or something.
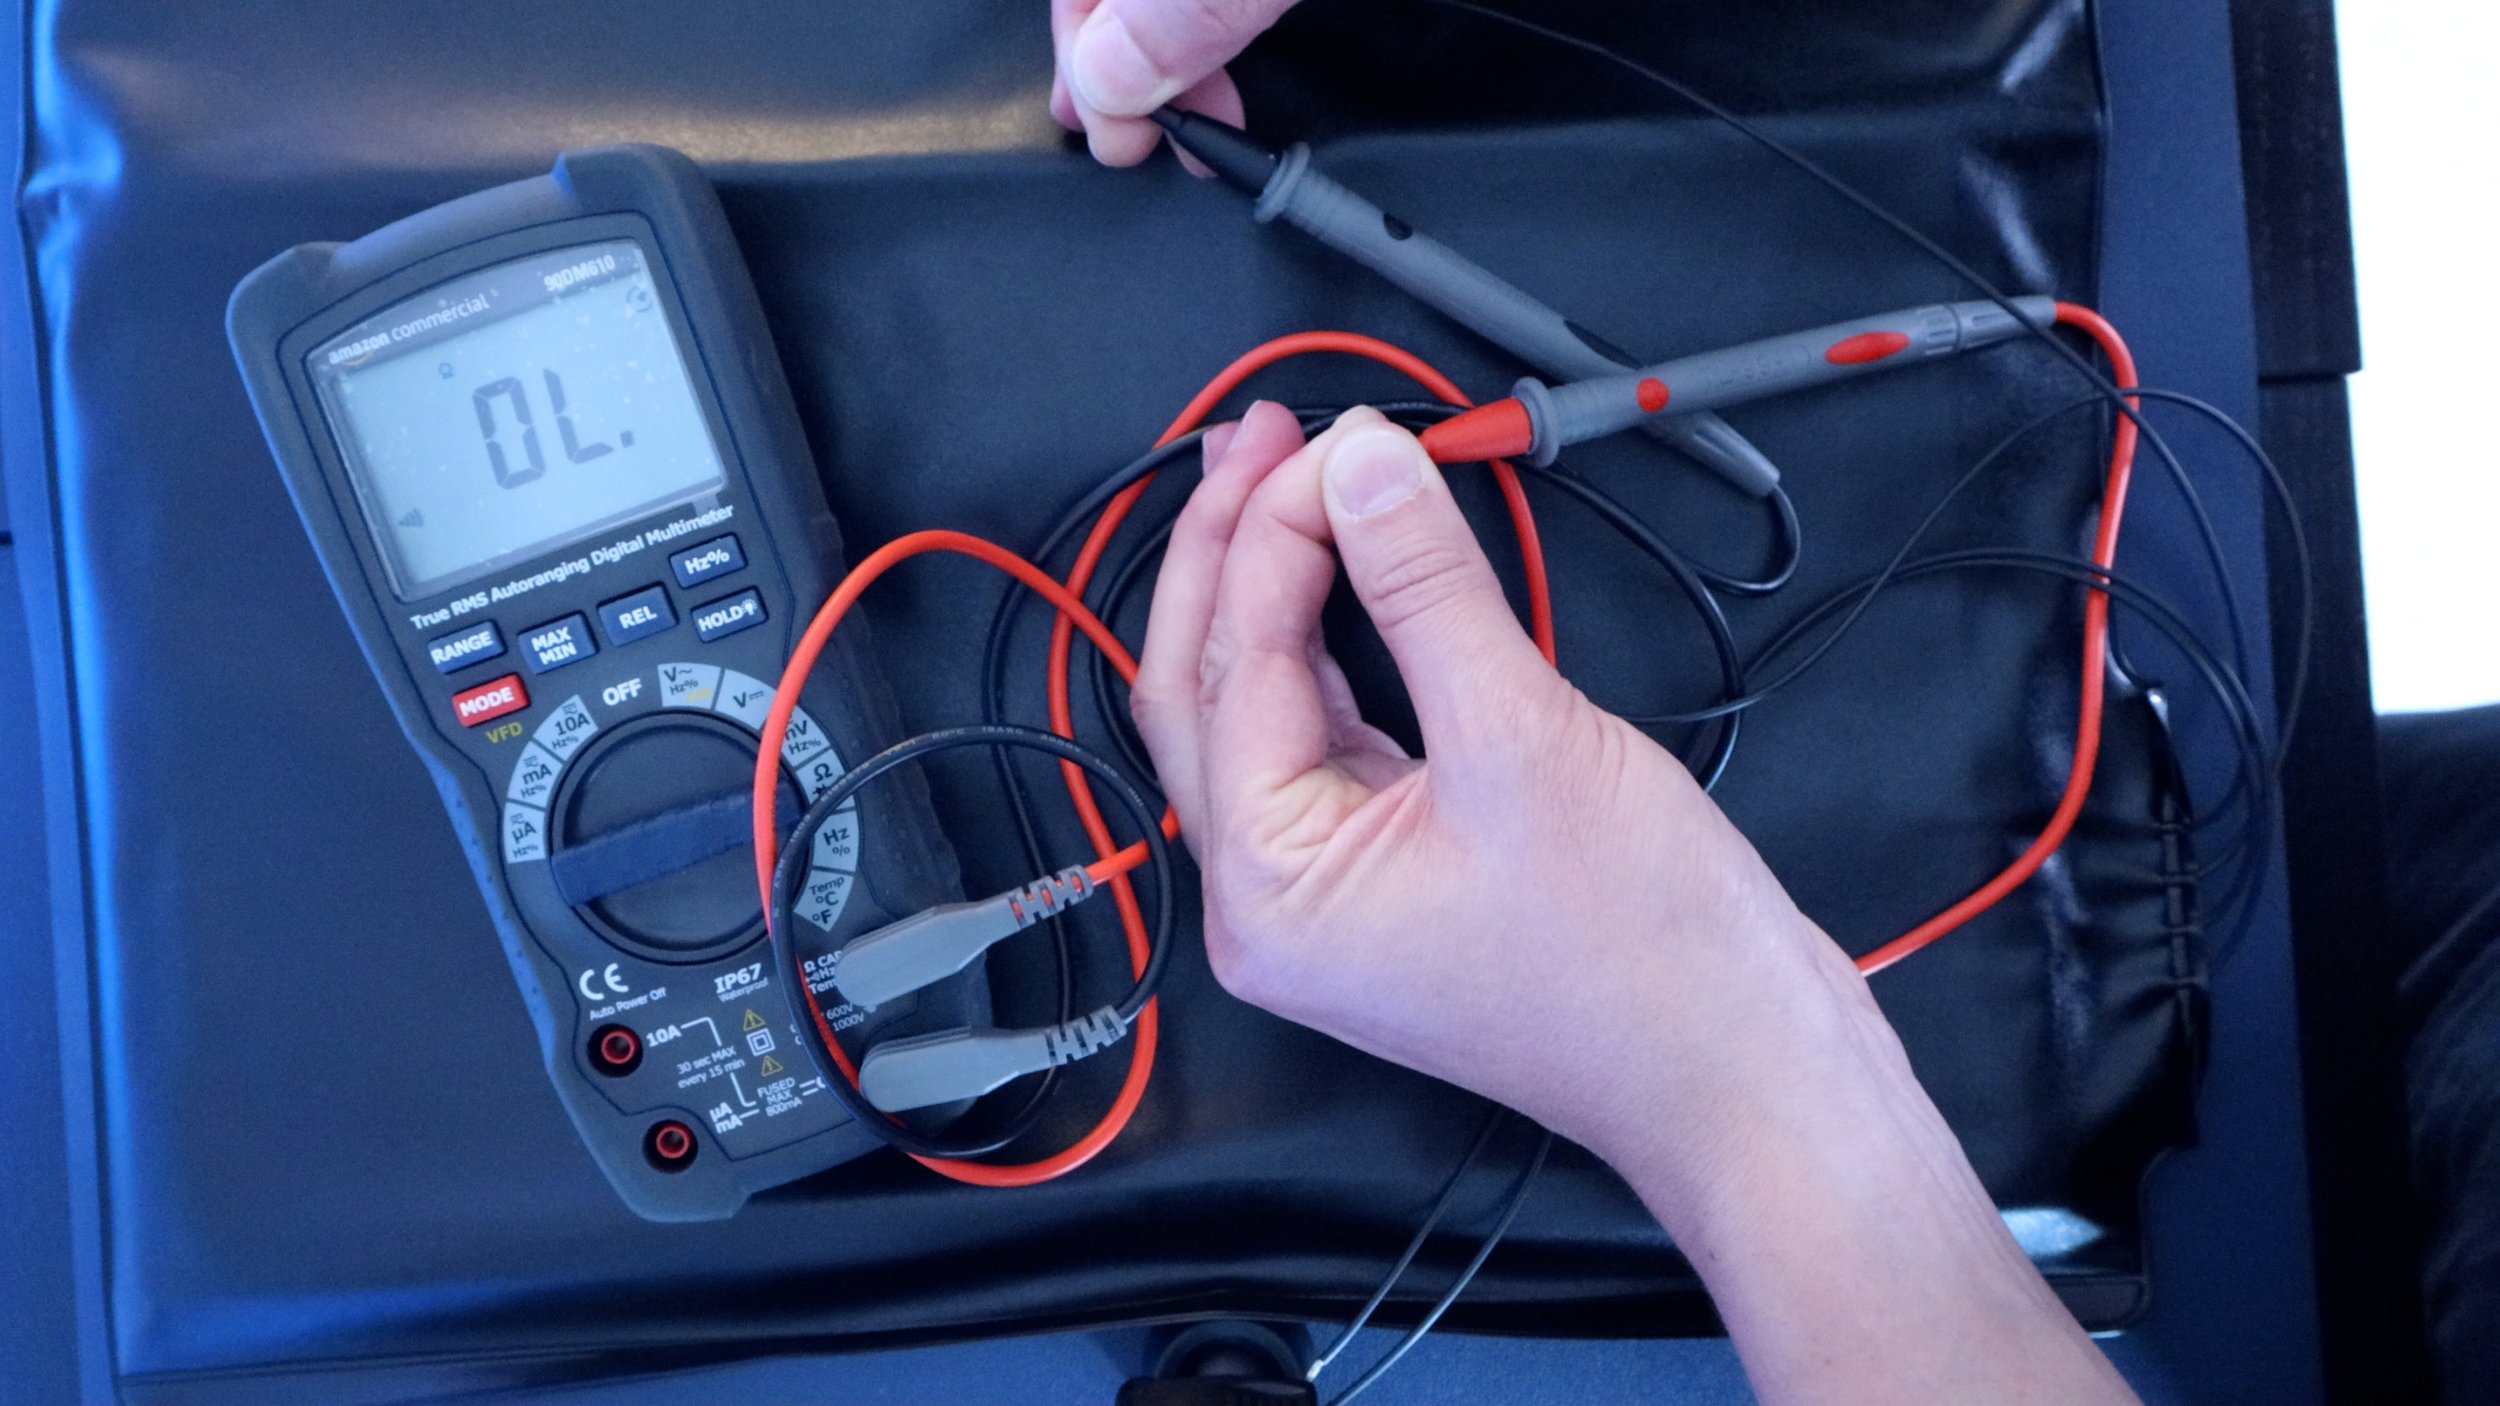
BEEEEEP!
As I mentioned, there are two ways you can make these sensors.
Using an Aqara Leak Sensor
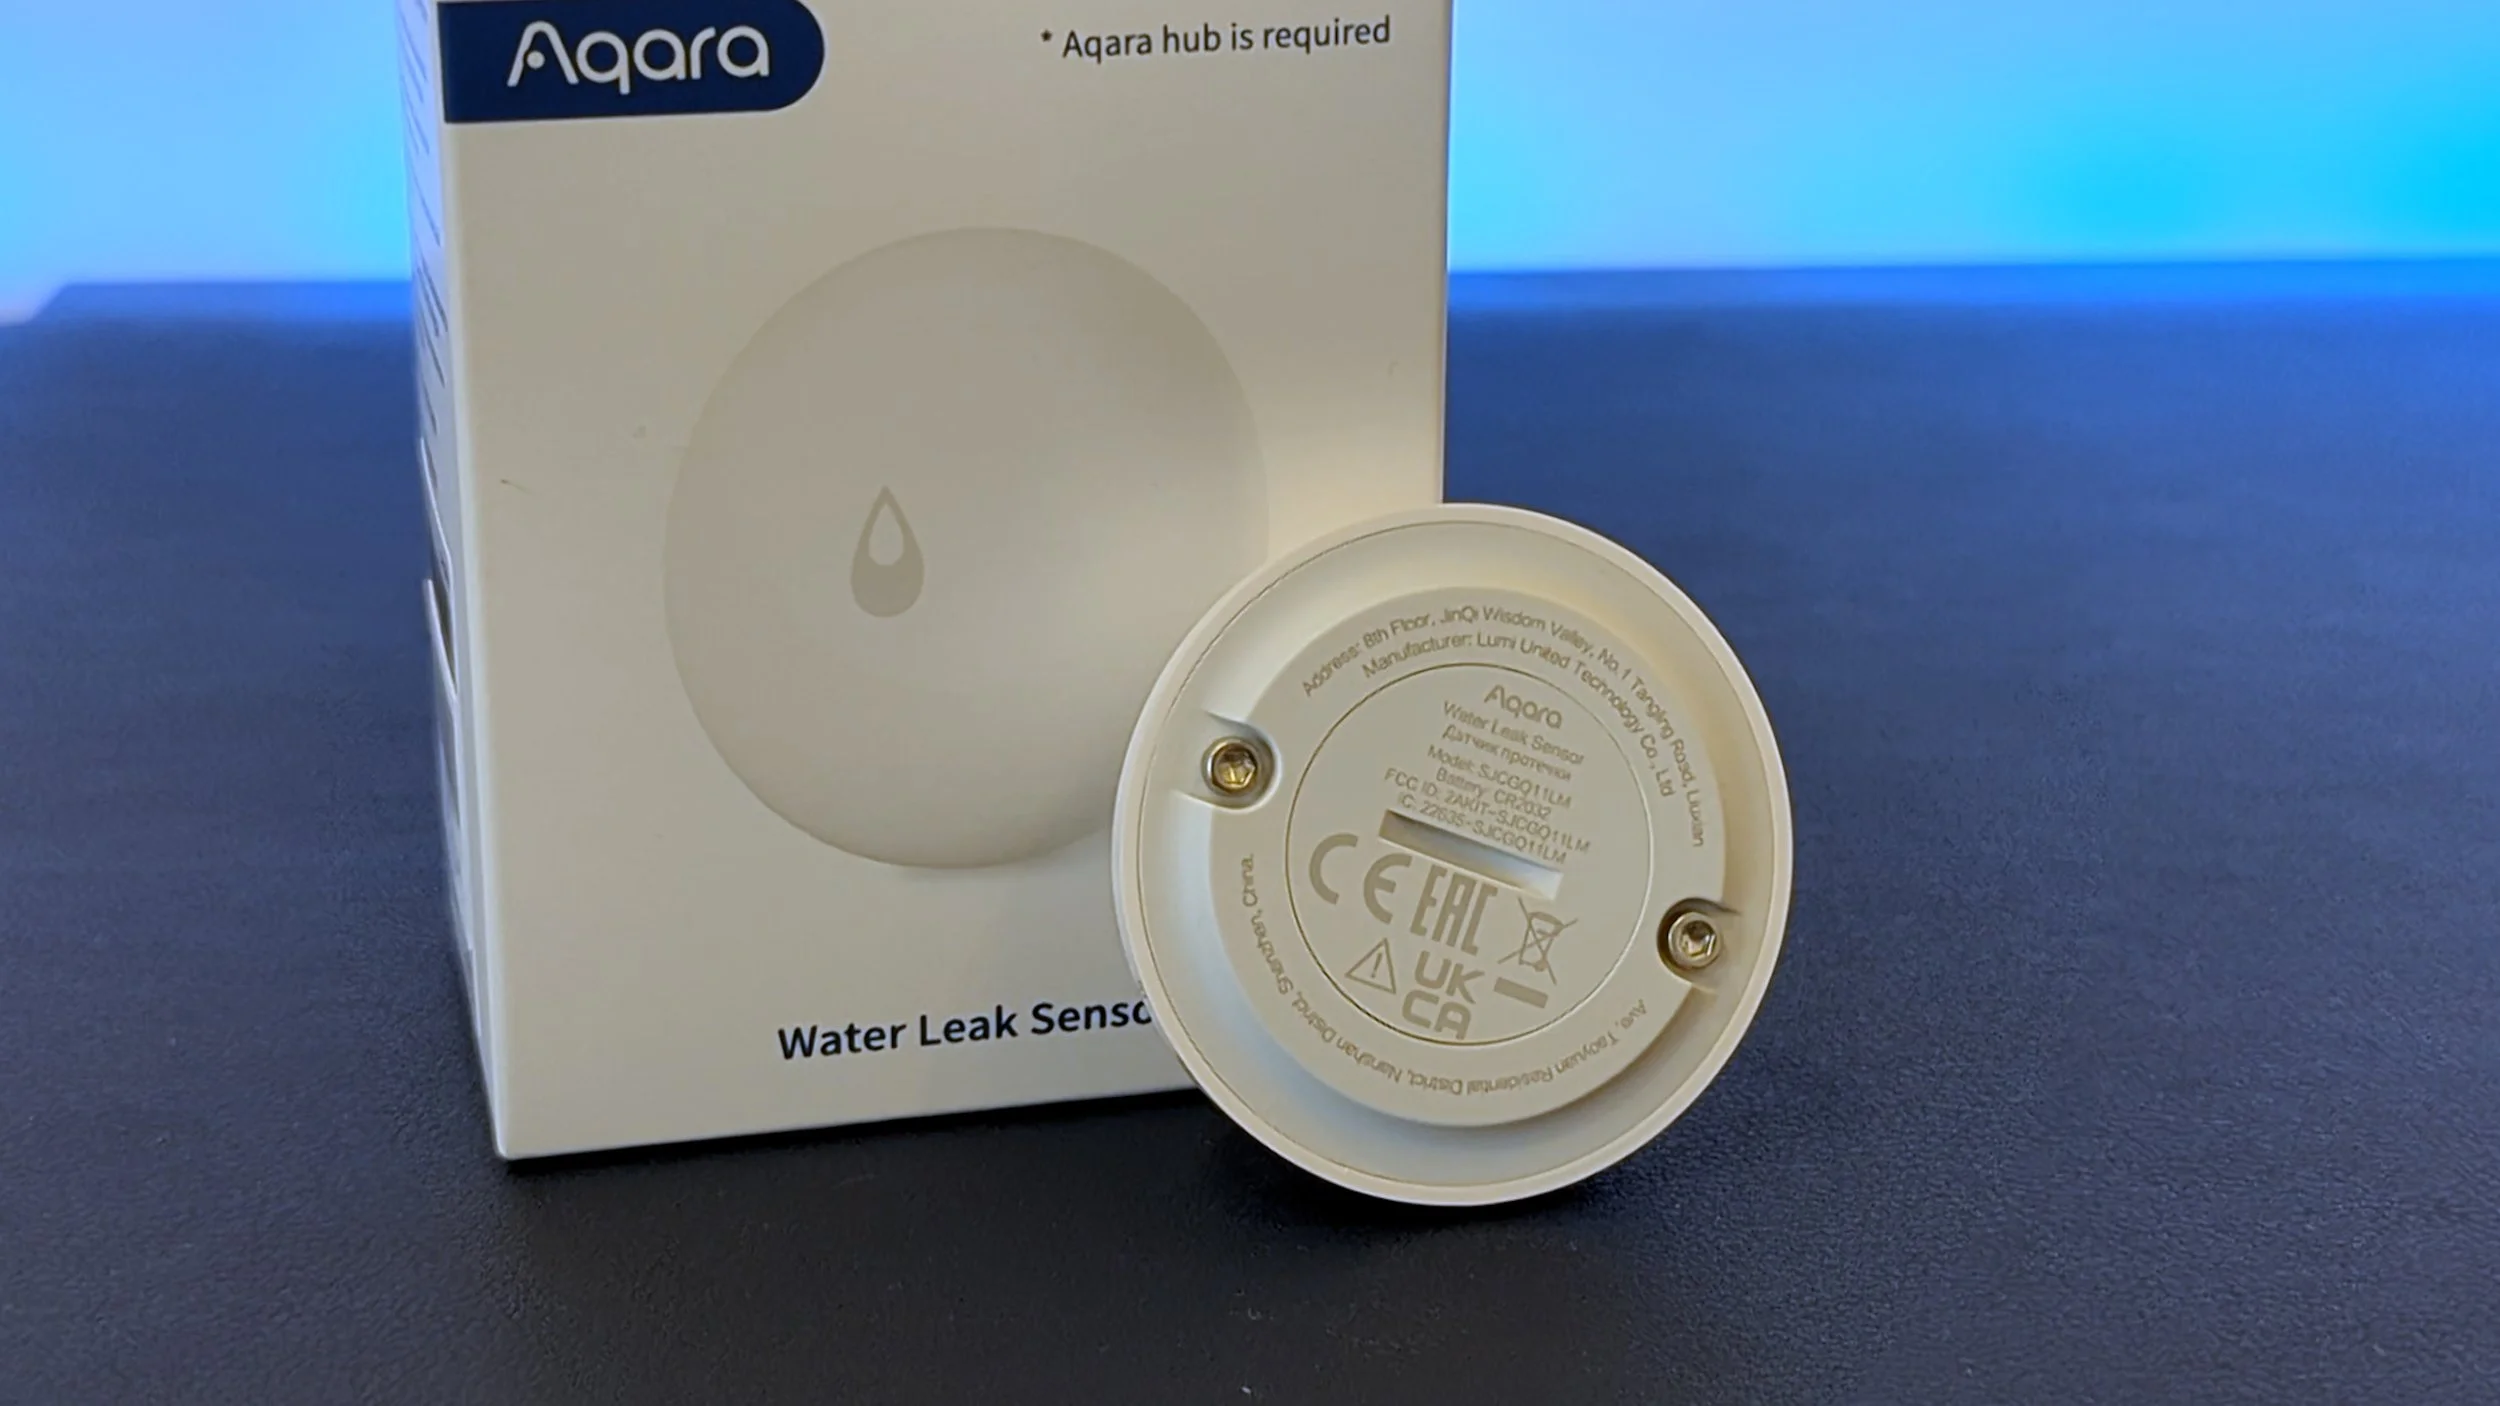
The first way is the easiest and uses a Zigbee Aqara Leak Sensor. You can buy these in a lot of places, and they conveniently have two removable terminals on the back that you can attach the wires from the pressure mat to.
Using ESPHome
You can also create a bed sensor using an ESP Device, and ESPHome. ESP Devices are small Bluetooth and WiFi enabled microcomputers, and when you combine them with the ESPHome software platform you can create almost any type of smart home sensor you want.
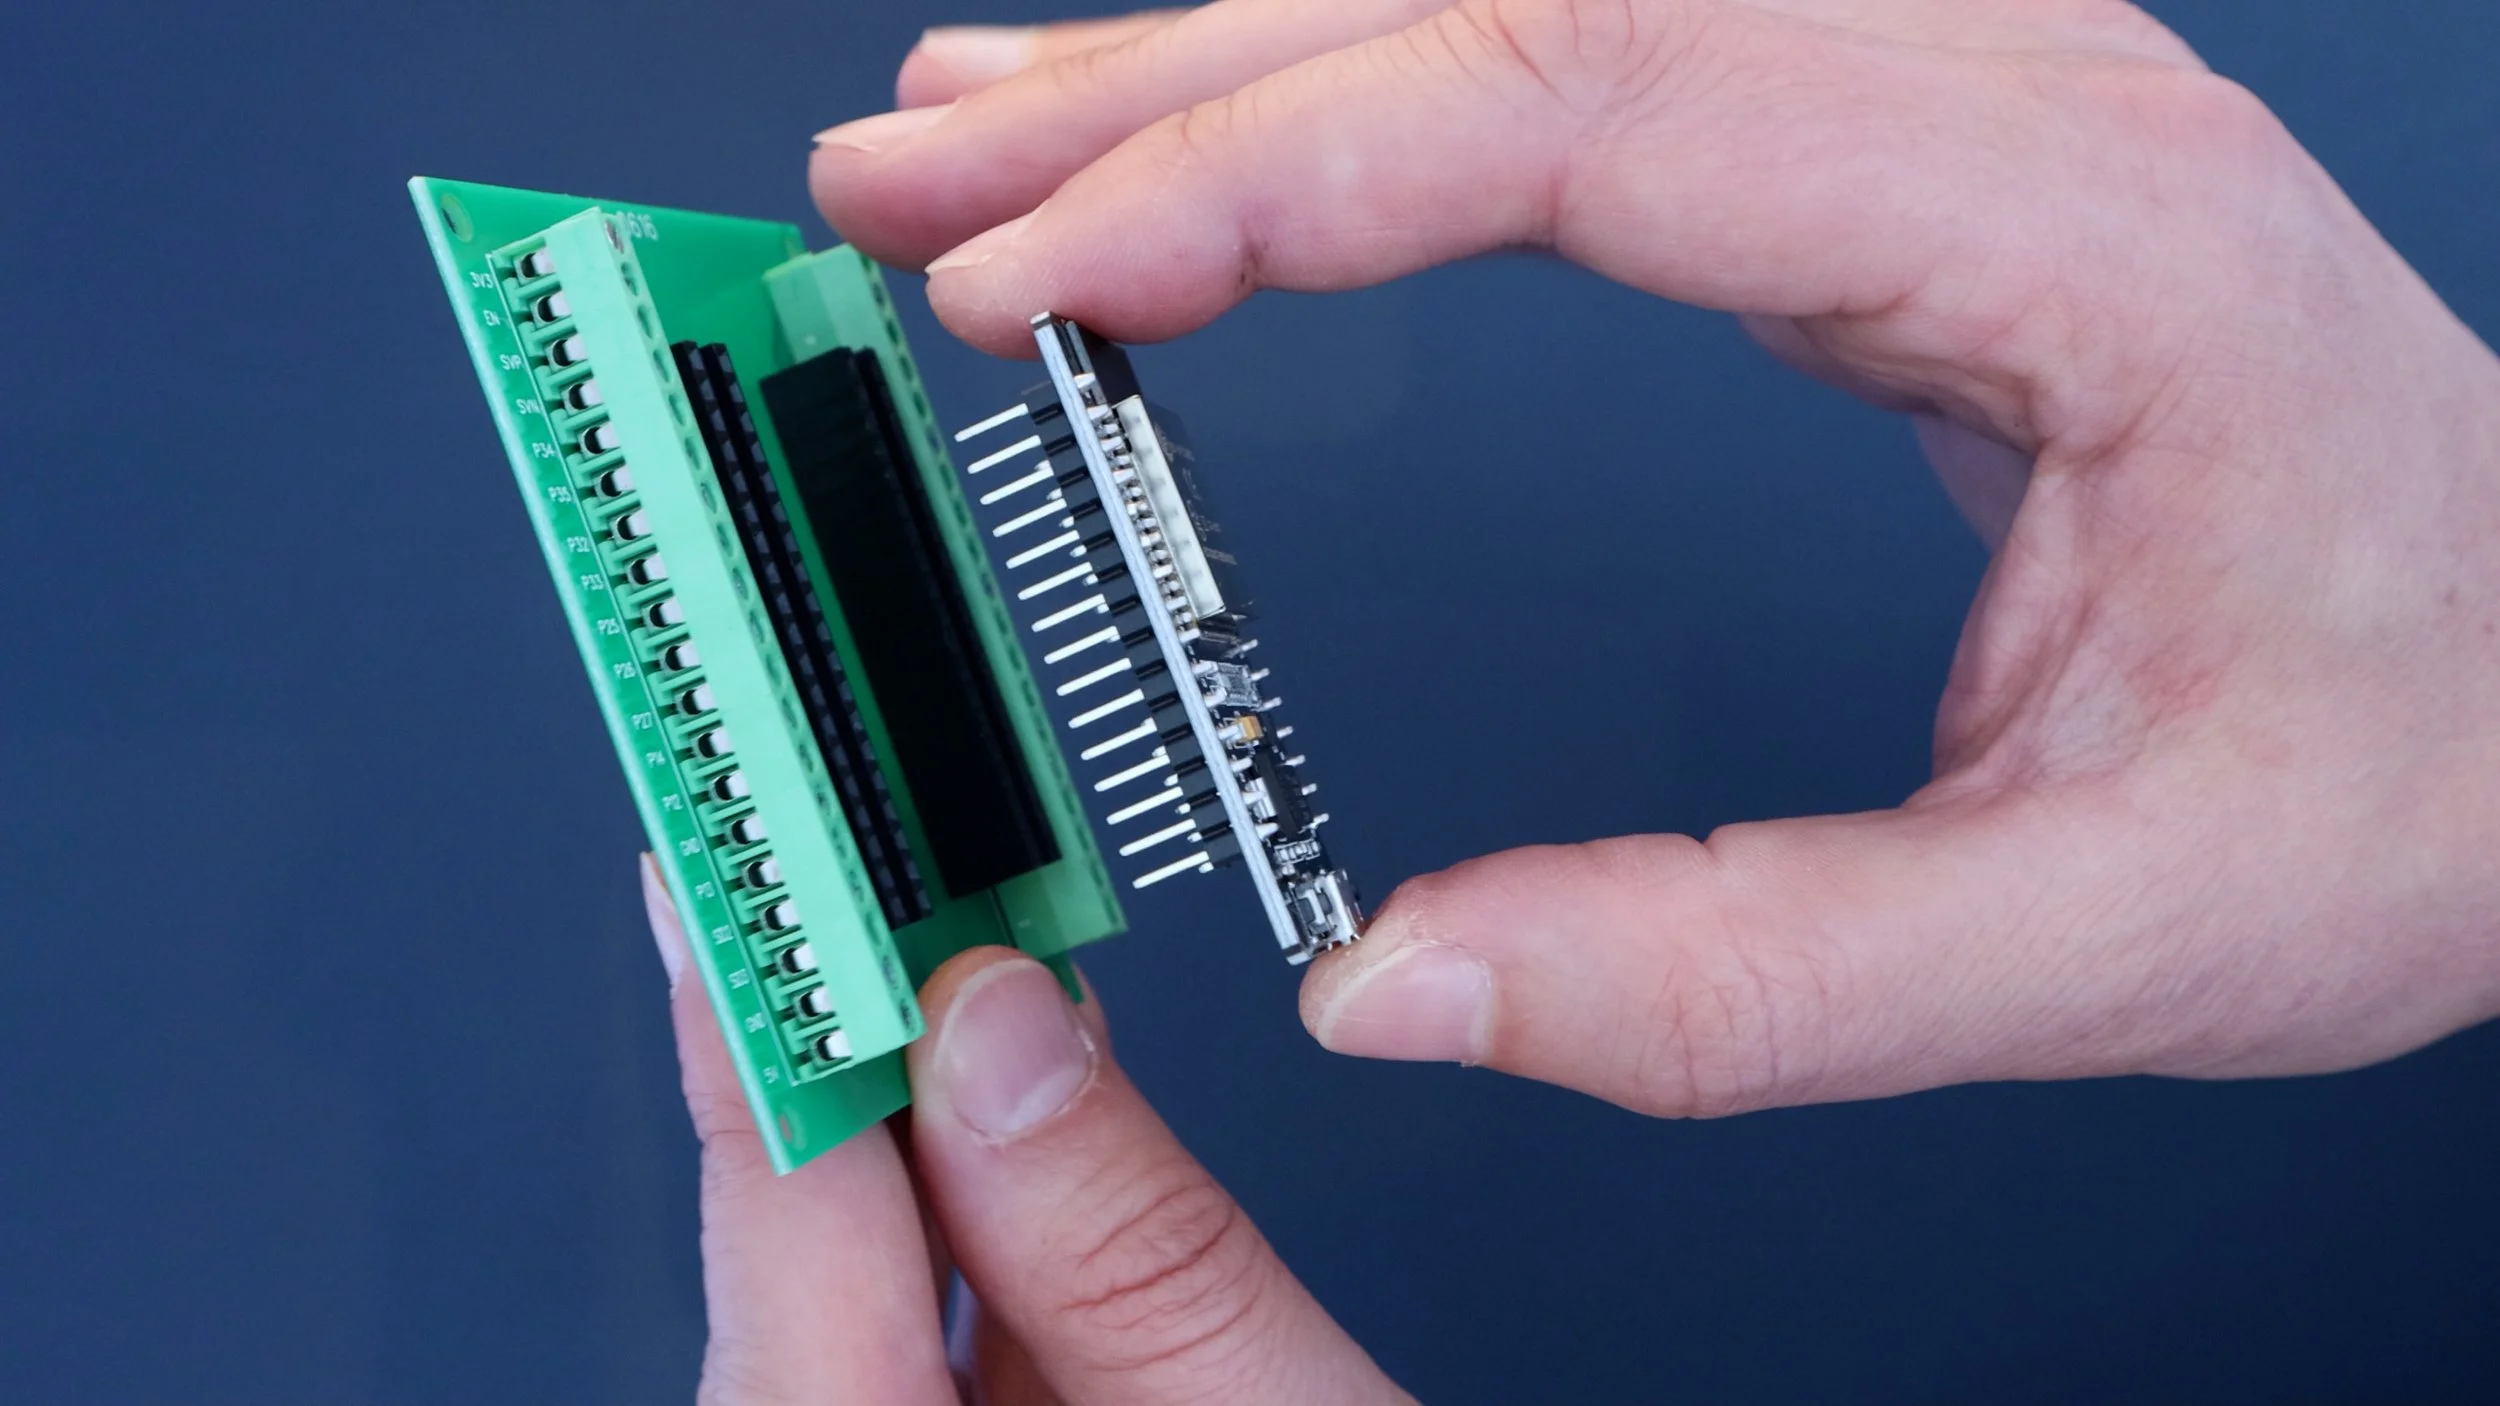
I figured that this project was the perfect way for me to get started with, and learn more about, ESPHome. If you want to take this route, you’ll need to buy an ESP Device. I recommend these ESP32s, and to make life easier I suggest getting these green companion development boards which let you screw cables into terminals for testing and prototyping - so you don’t need to bother with all that soldering.
The Build - Easy Mode
All you really need to do is attach the two wires you identified previously to the terminals on the back of the Leak Sensor. You can use a small Allen Key to remove the terminals and then just shove the wires underneath and tighten them up.

Now pair the leak sensors with your favourite smart home platform, like the Aqara Hub, HomeKit, or Home Assistant using ZHA or Zigbee2MQTT.
When you now press down on the pad, you should see that smart home platform tell you that a leak has been detected!
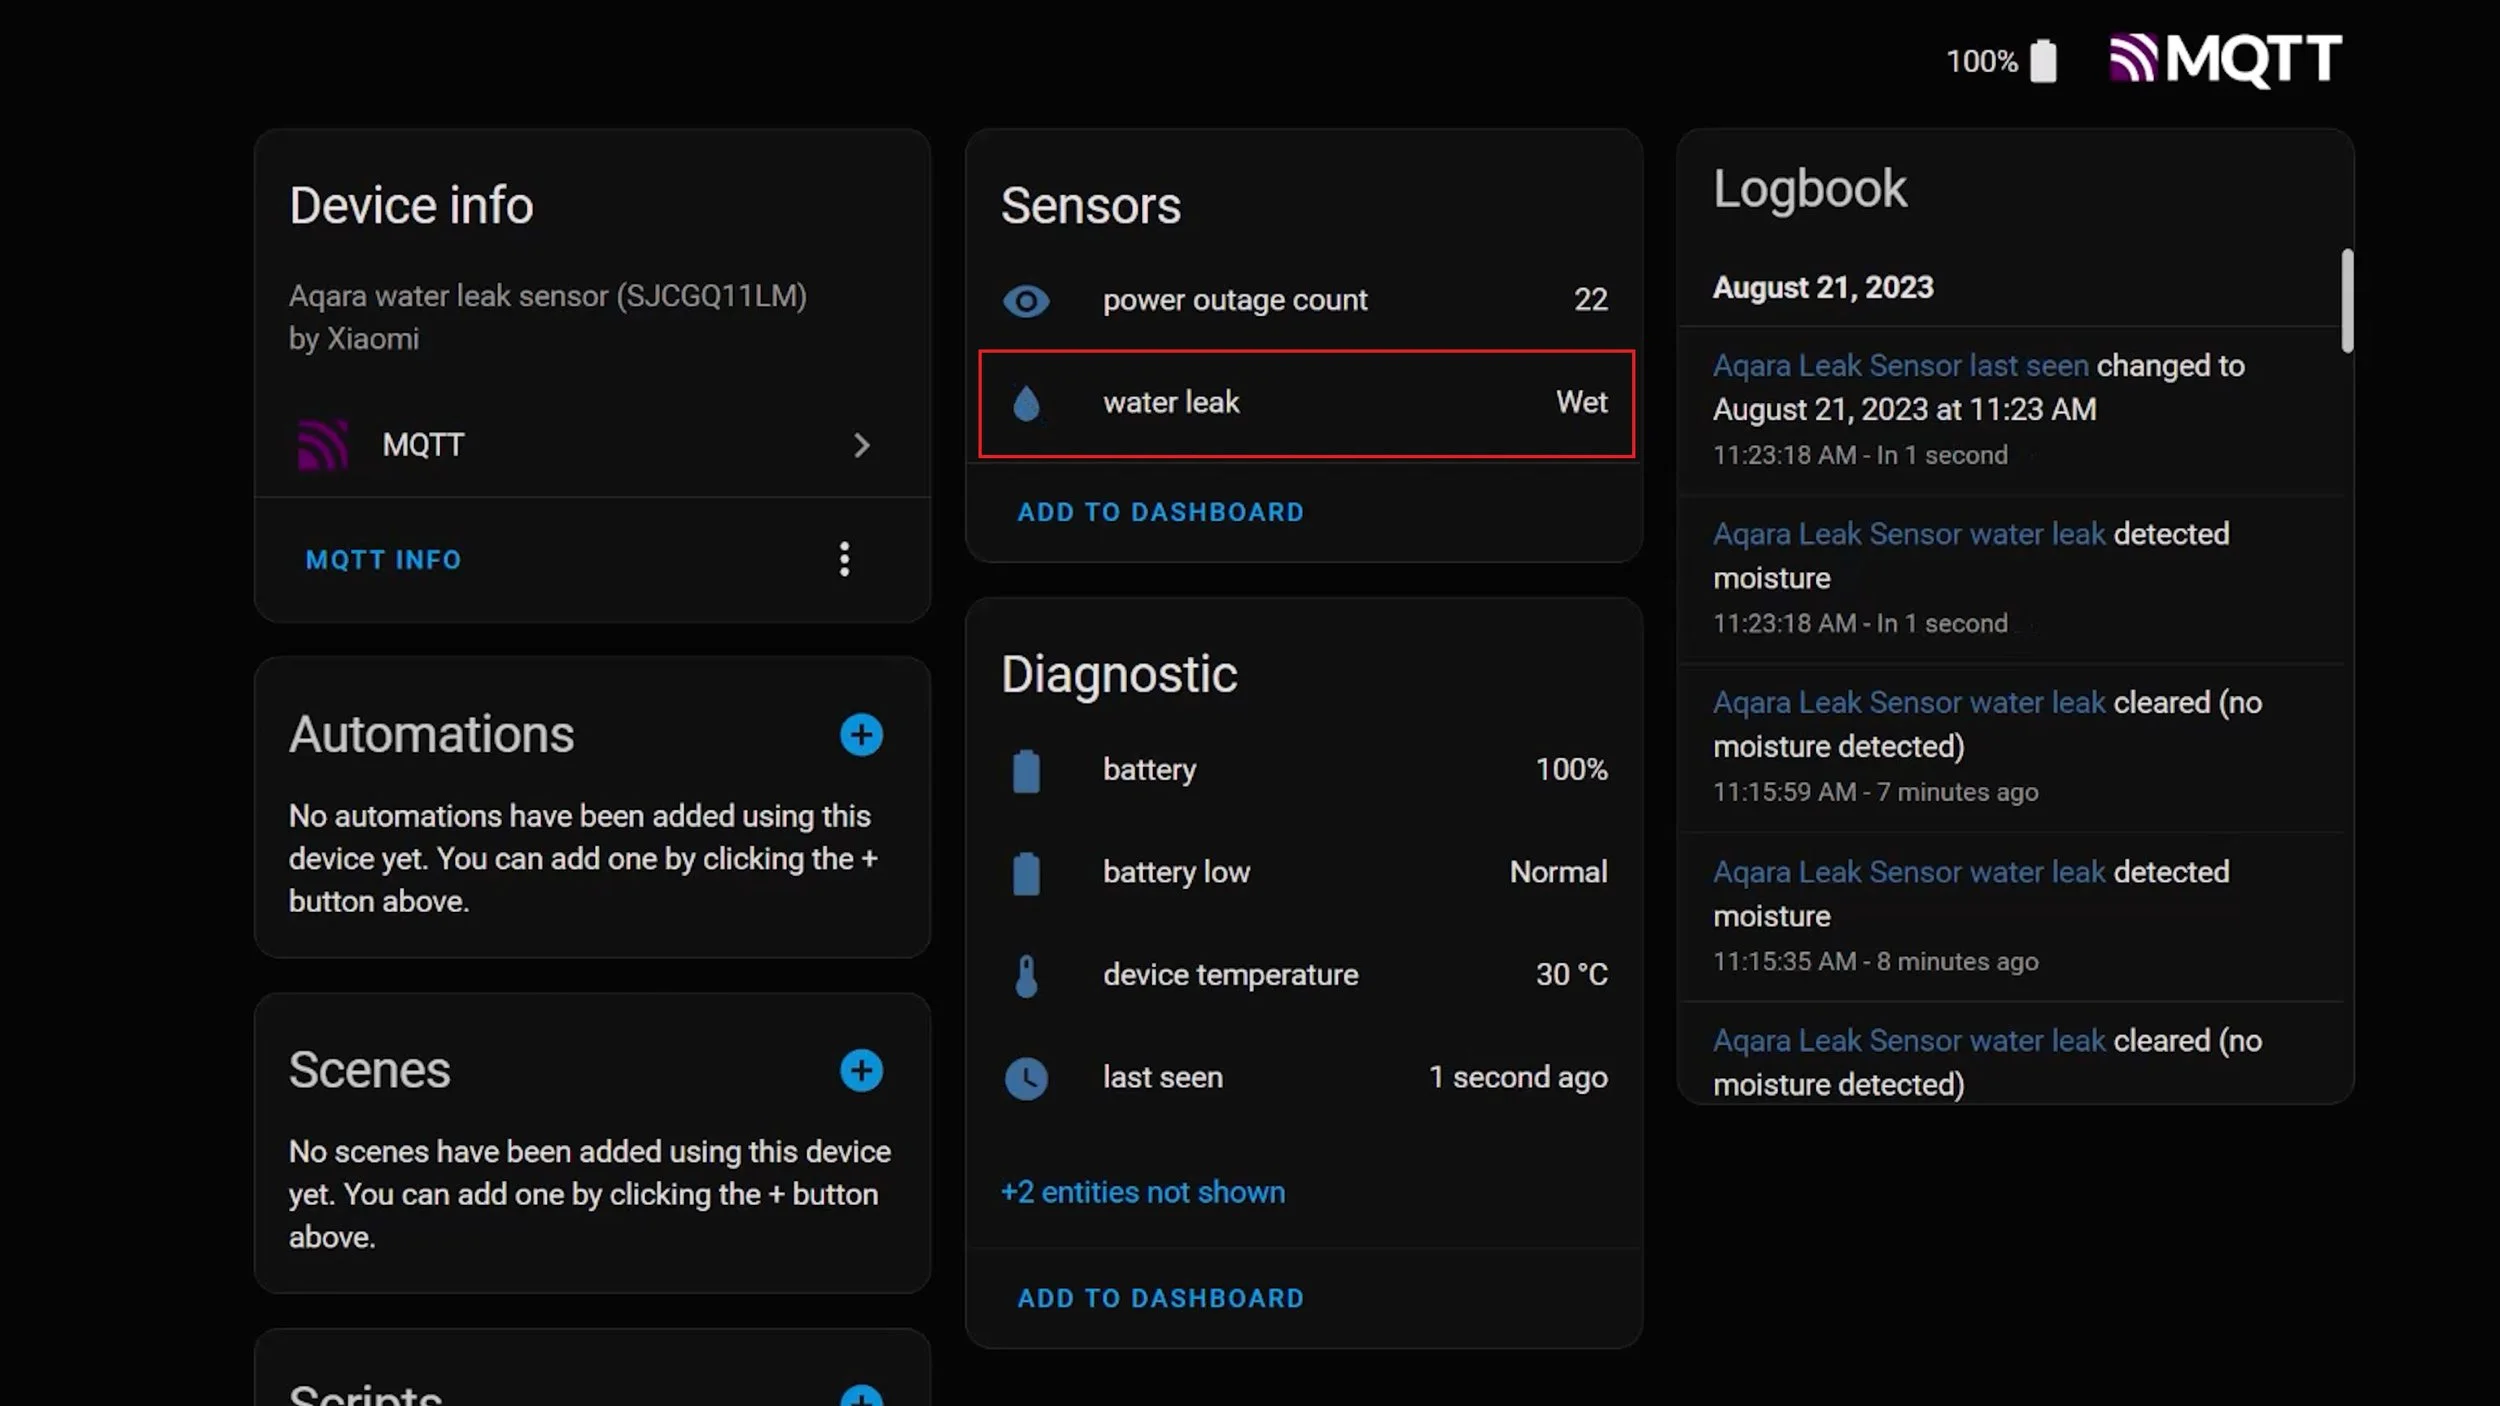
You could use this sensor in your automations right now, triggering any automation when the sensor goes from dry to wet… but do you really want your bed sensor telling you that you’ve leaked into the bed? No, probably not.
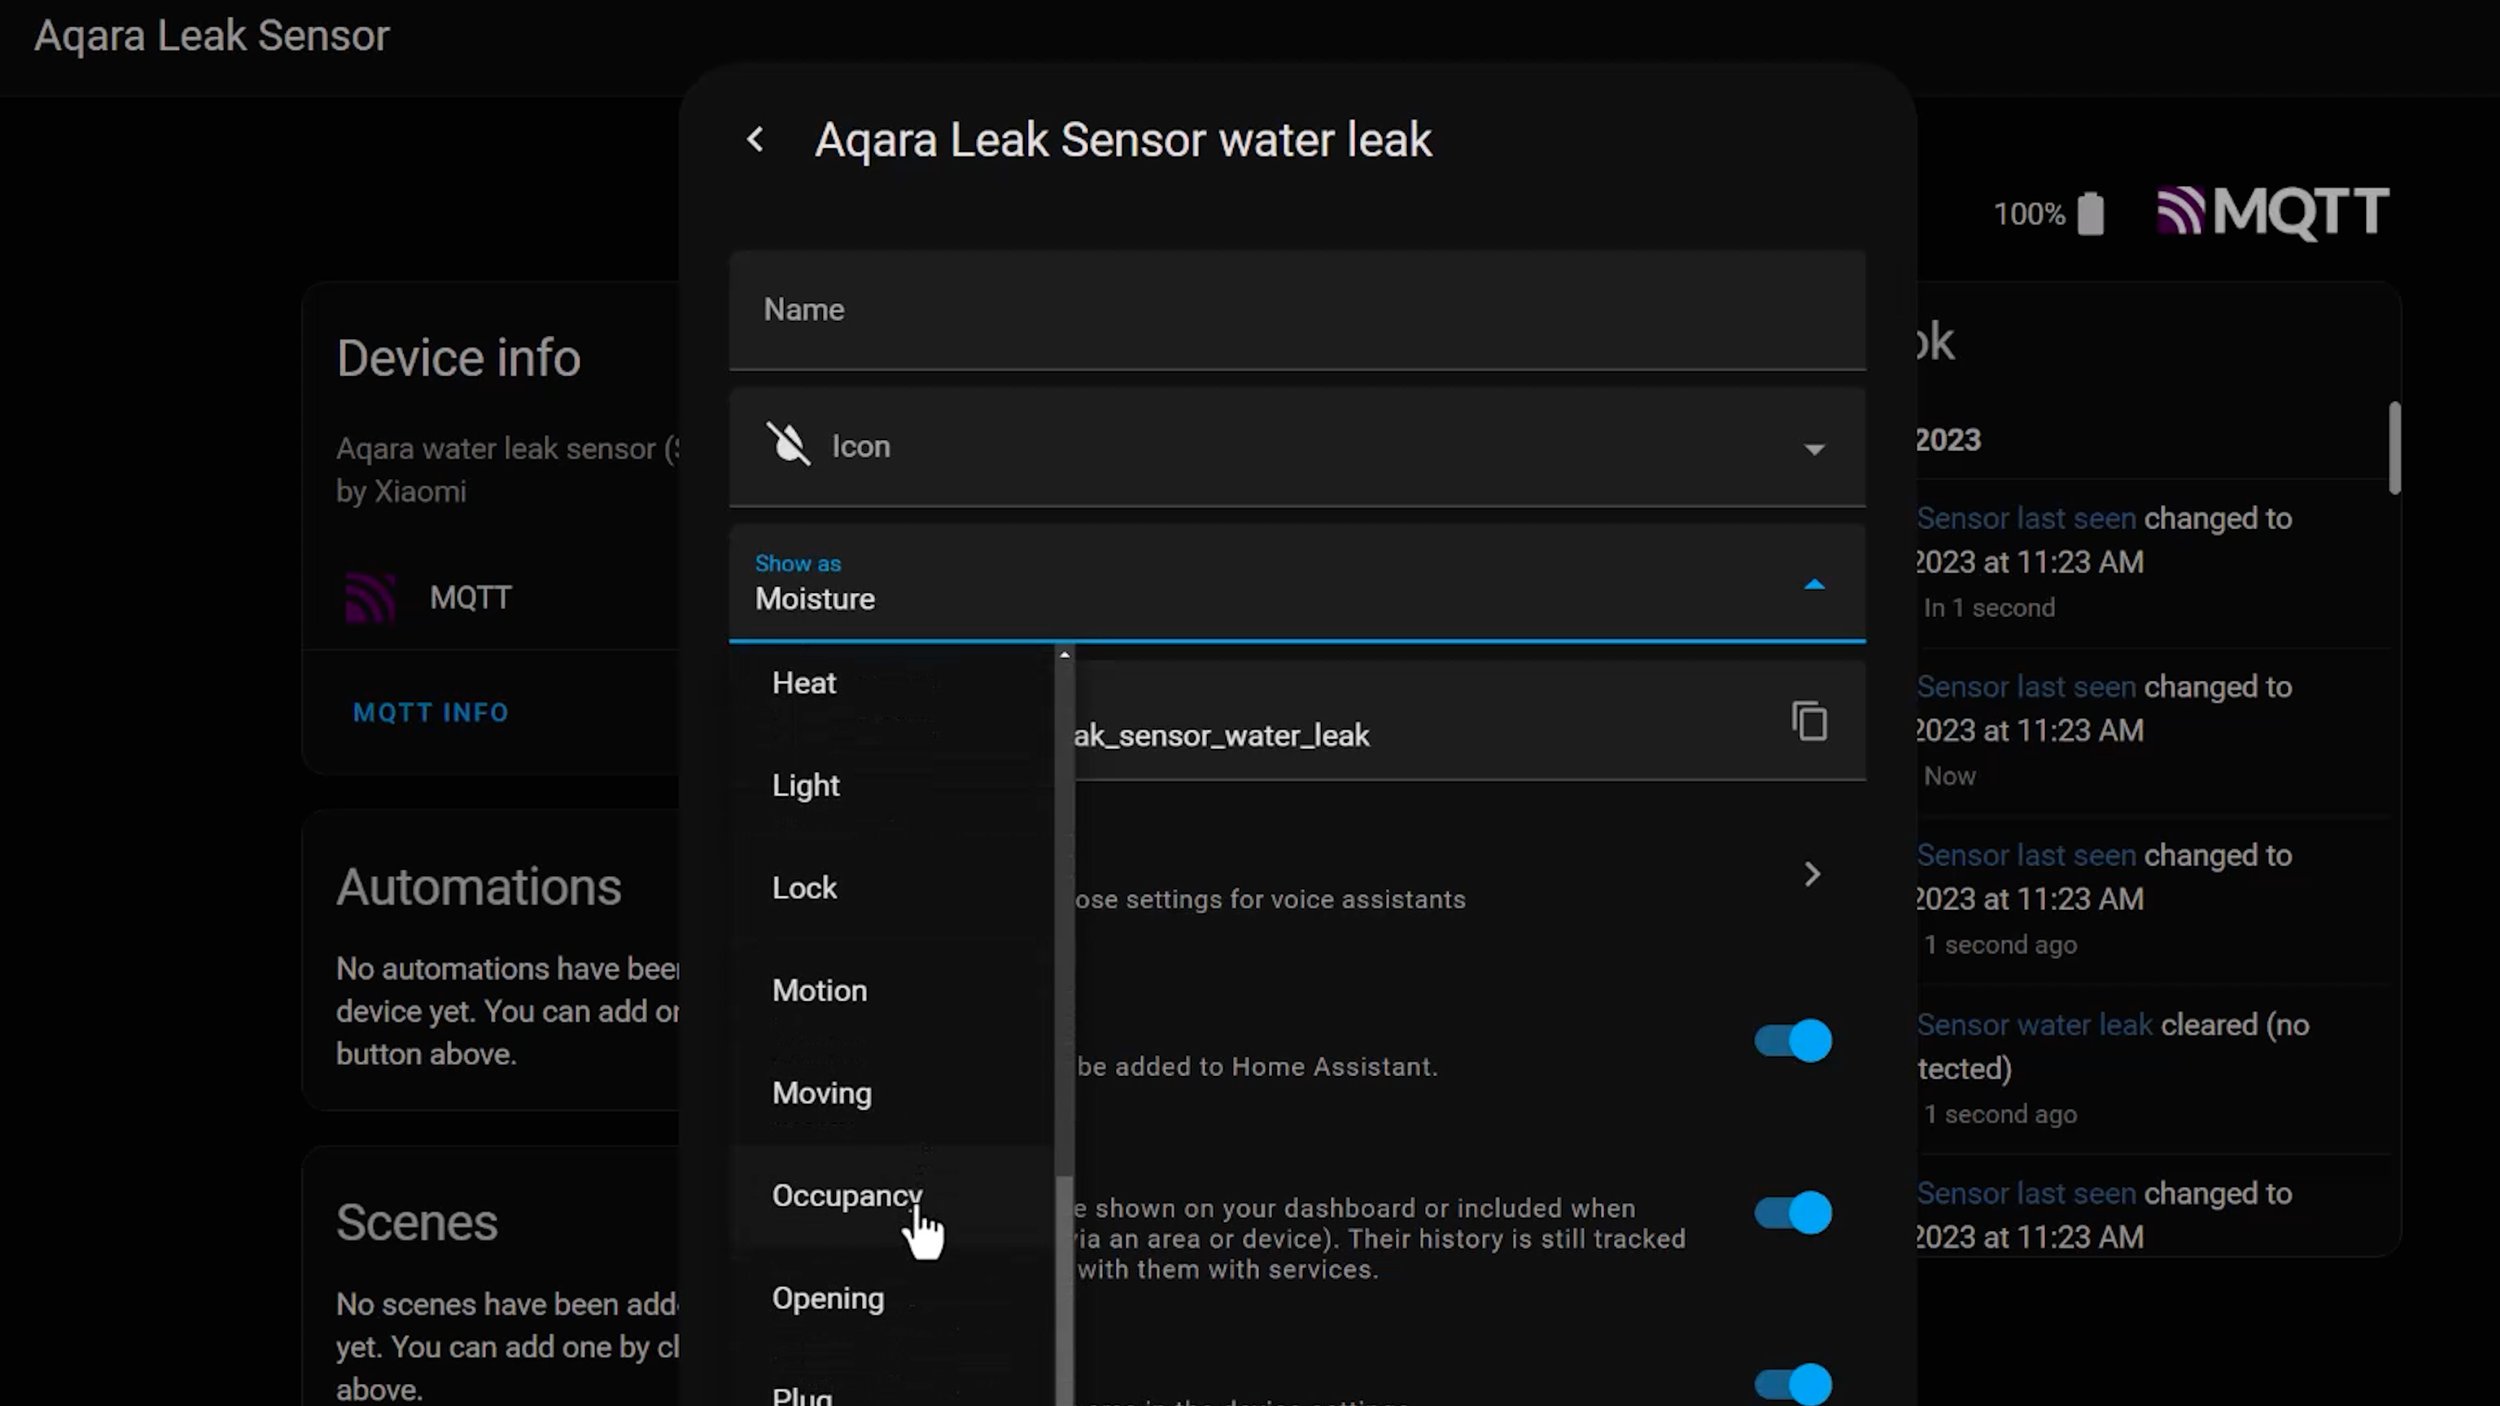
In Home Assistant you can go to the settings of that entity, and change the Show As part from Moisture to Occupancy.
Now, Home Assistant will report Clear or Detected, instead of Dry and Wet when you press down on the pressure mat

And you’re done, you now have your very own pressure sensor that you can put under your mattress, under a sofa, wherever you want to know if something, or someone, has been placed on top of it!
The Build - ESPHome
A bed sensor is a very simple binary sensor, it’s either ON (Someone is in bed) or OFF (No-one is in the bed). For me, this was the perfect project to use to learn more about ESP devices and ESPHome.
The concept is pretty much the same: When pressure is applied to the mat, it closes the connection and completes the circuit, so we can use ESPHome to detect that and tell Home Assistant.
Wire it up
To get started, we screw the same two wires from the pressure mat to the ESP Device. One of the wires needs to connect to the Ground terminal (GND), and the other to one of the GPIO Pins. I’ve chosen GPIO13, because it happens to be the one that’s next to the GND terminal on my device.
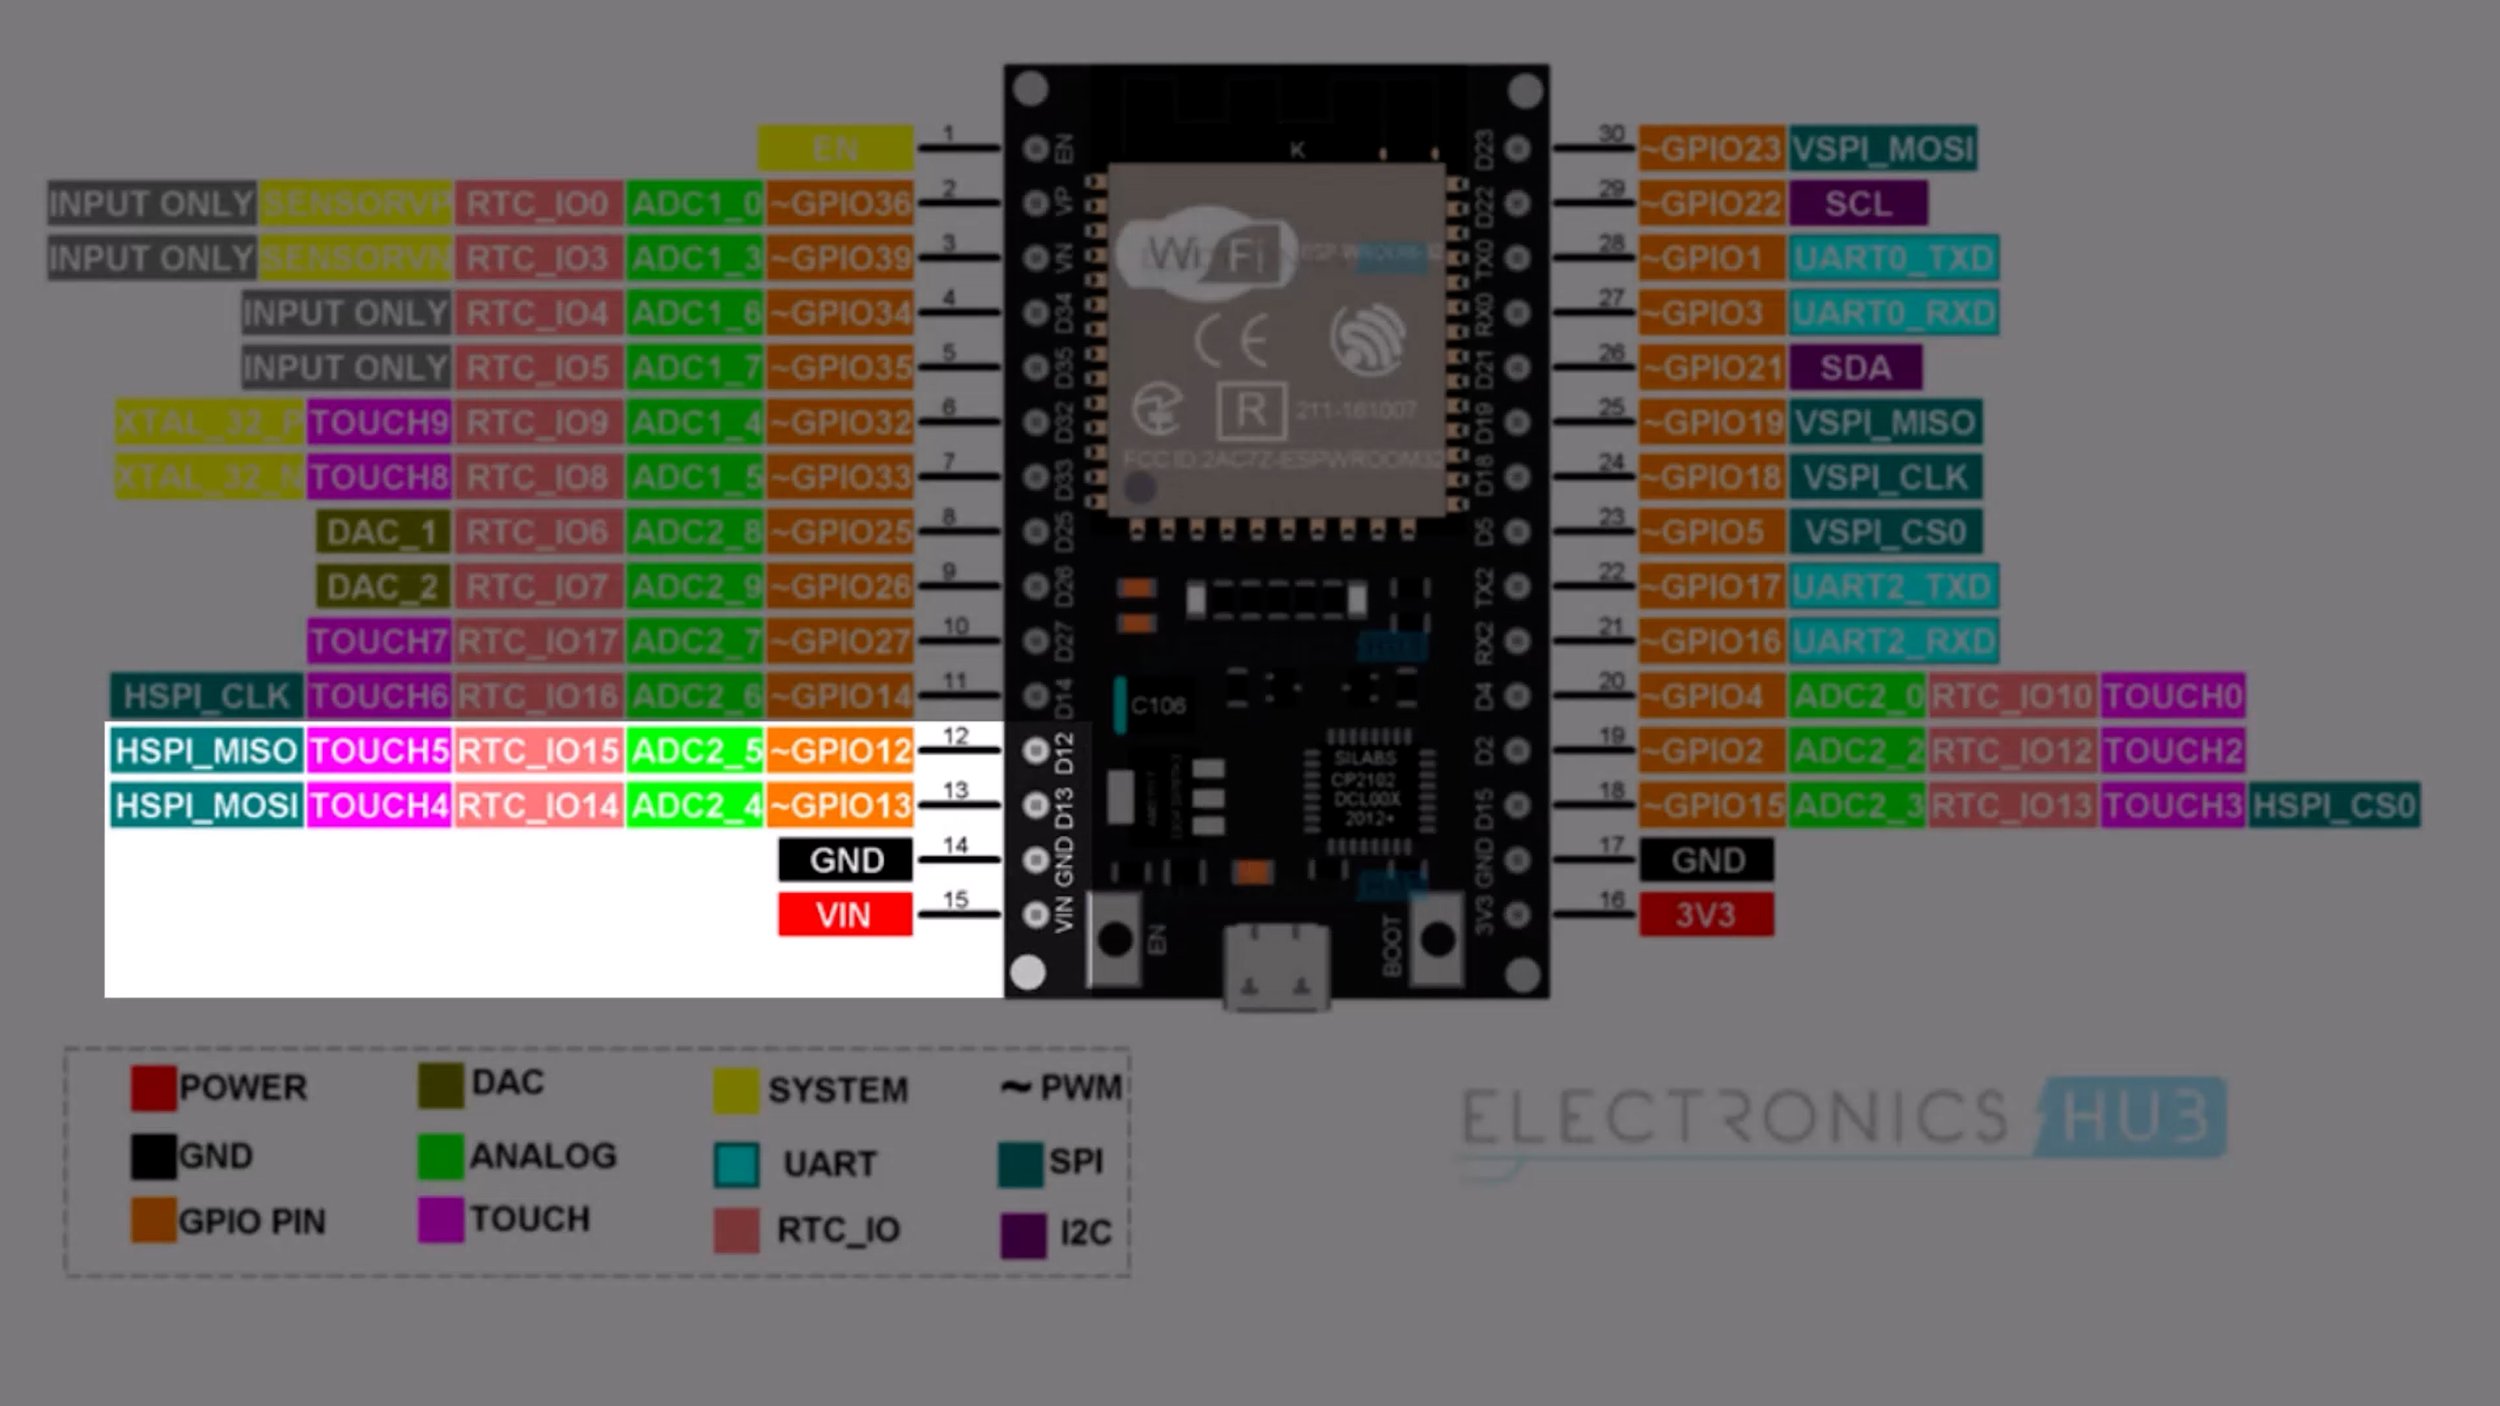
ESP32 Pin Guide from ElectronicsHub.org

Install the ESPHome firmware
Once you’ve wired up the device, plug it into a PC using a USB data cable. The key term there is DATA CABLE. So many times I’ve plugged them into my PC using a generic USB charging cable that has no data wires inside it, and then I pull my hair out wondering why it won’t connect.
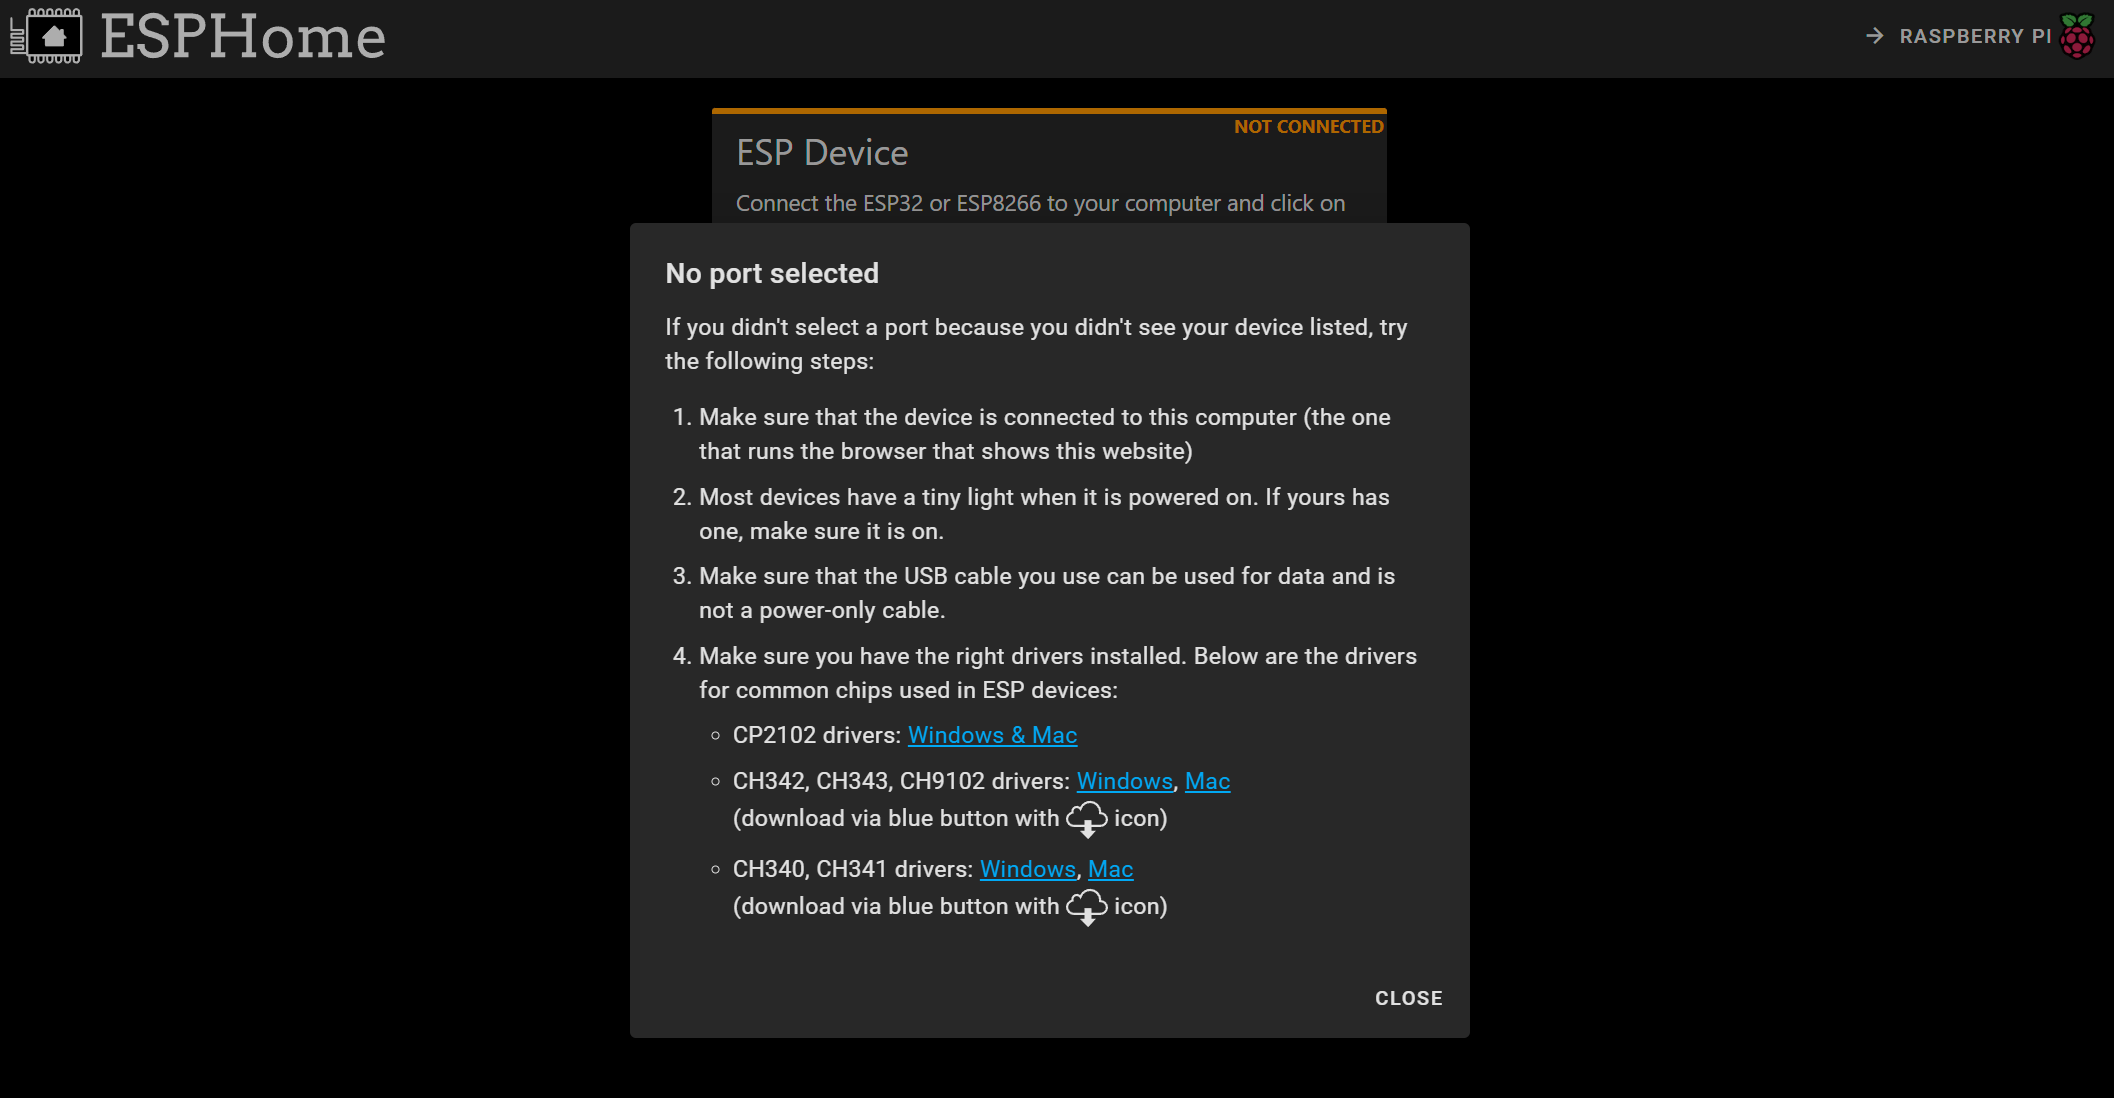
Then open up https://web.esphome.io and click the connect button.

Click on the device in the list, and click connect.
If you get a message saying that no compatible devices could be found then click Cancel, and follow the troubleshooting steps. Most likely you will need to install the drivers for the ESP devices, and there are links in the pop up message for your operating system.
Once you’ve checked the drivers and cable, you can click Connect again and hopefully the devices is found. Connect to it and then you can press Prepare for First Use, which will install the default ESPHome firmware onto it.

Once it is installed, connect it to your Wifi network and you’re ready for the next step.

Connect ESPHome to Home Assistant
Now pop over to Home Assistant and go to the Add Ons section. Here you’ll need to install the ESPHome Add On, which acts as the control center for all your ESPHome devices.
If you aren’t using Home Assistant Operating System, you can install the ESPHome control center using Docker. The ESPHome website has all the instructions you need.
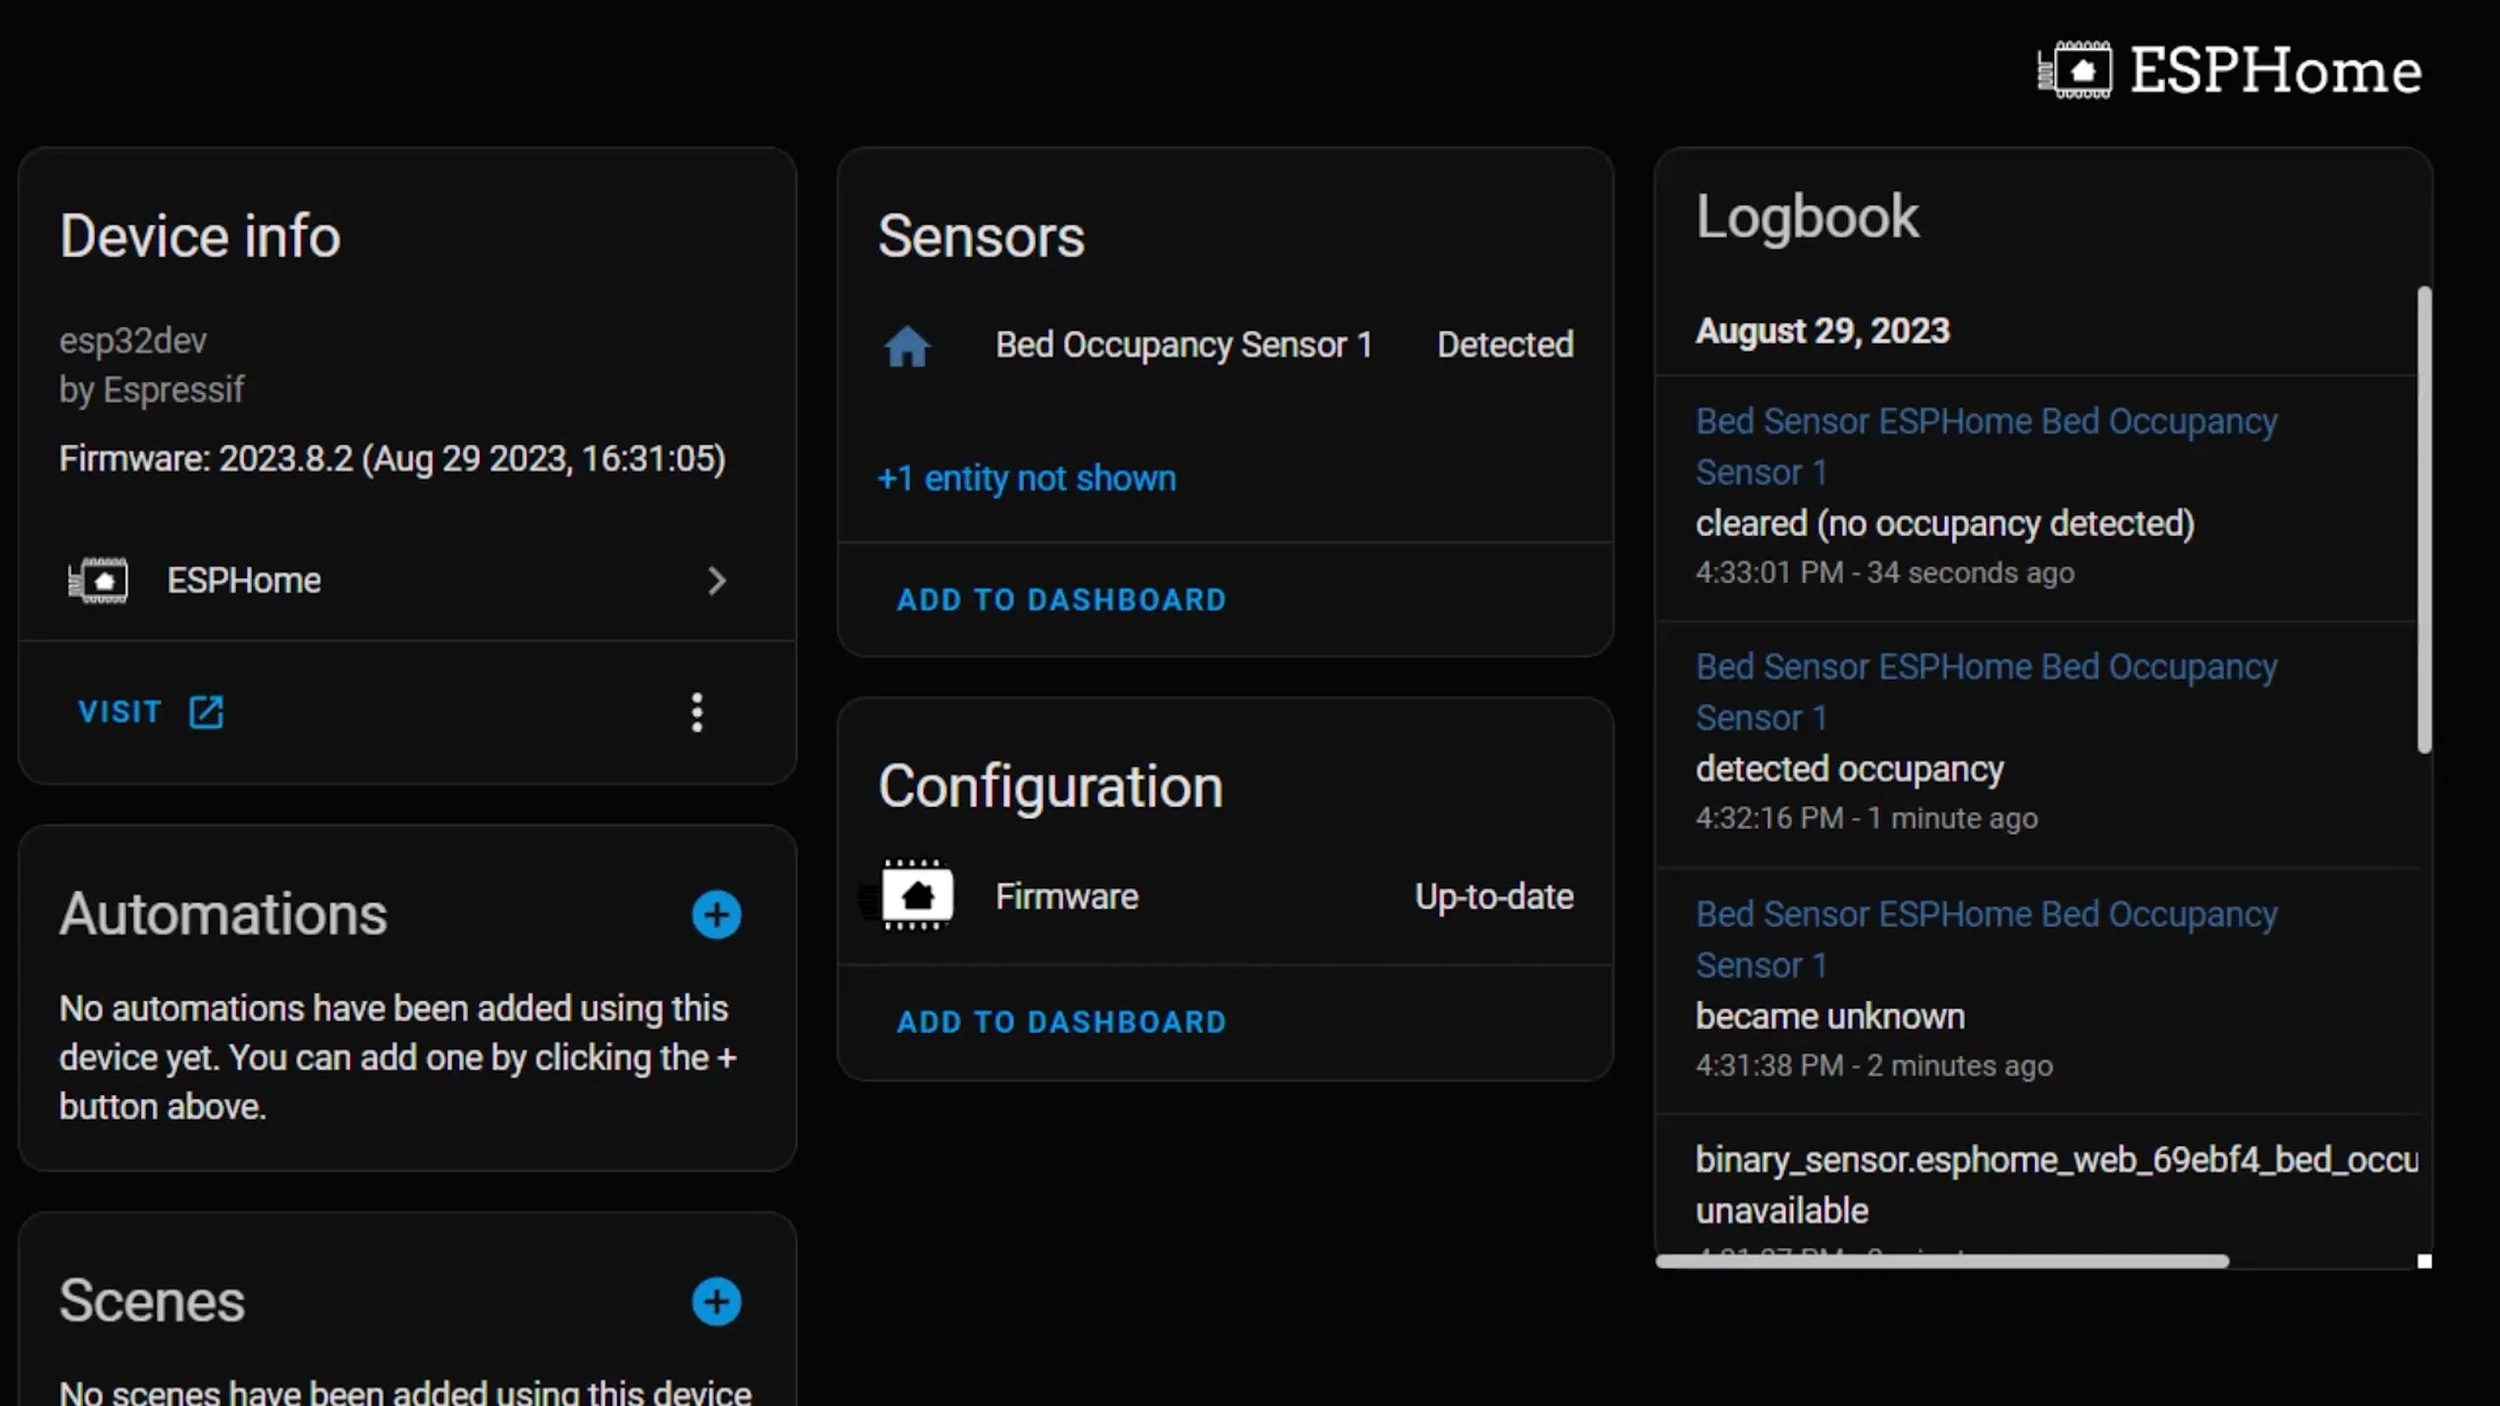
Once you’ve installed it, go to the ESPHome Add On web interface and hopefully you see the new ESPDevice auto discovered.
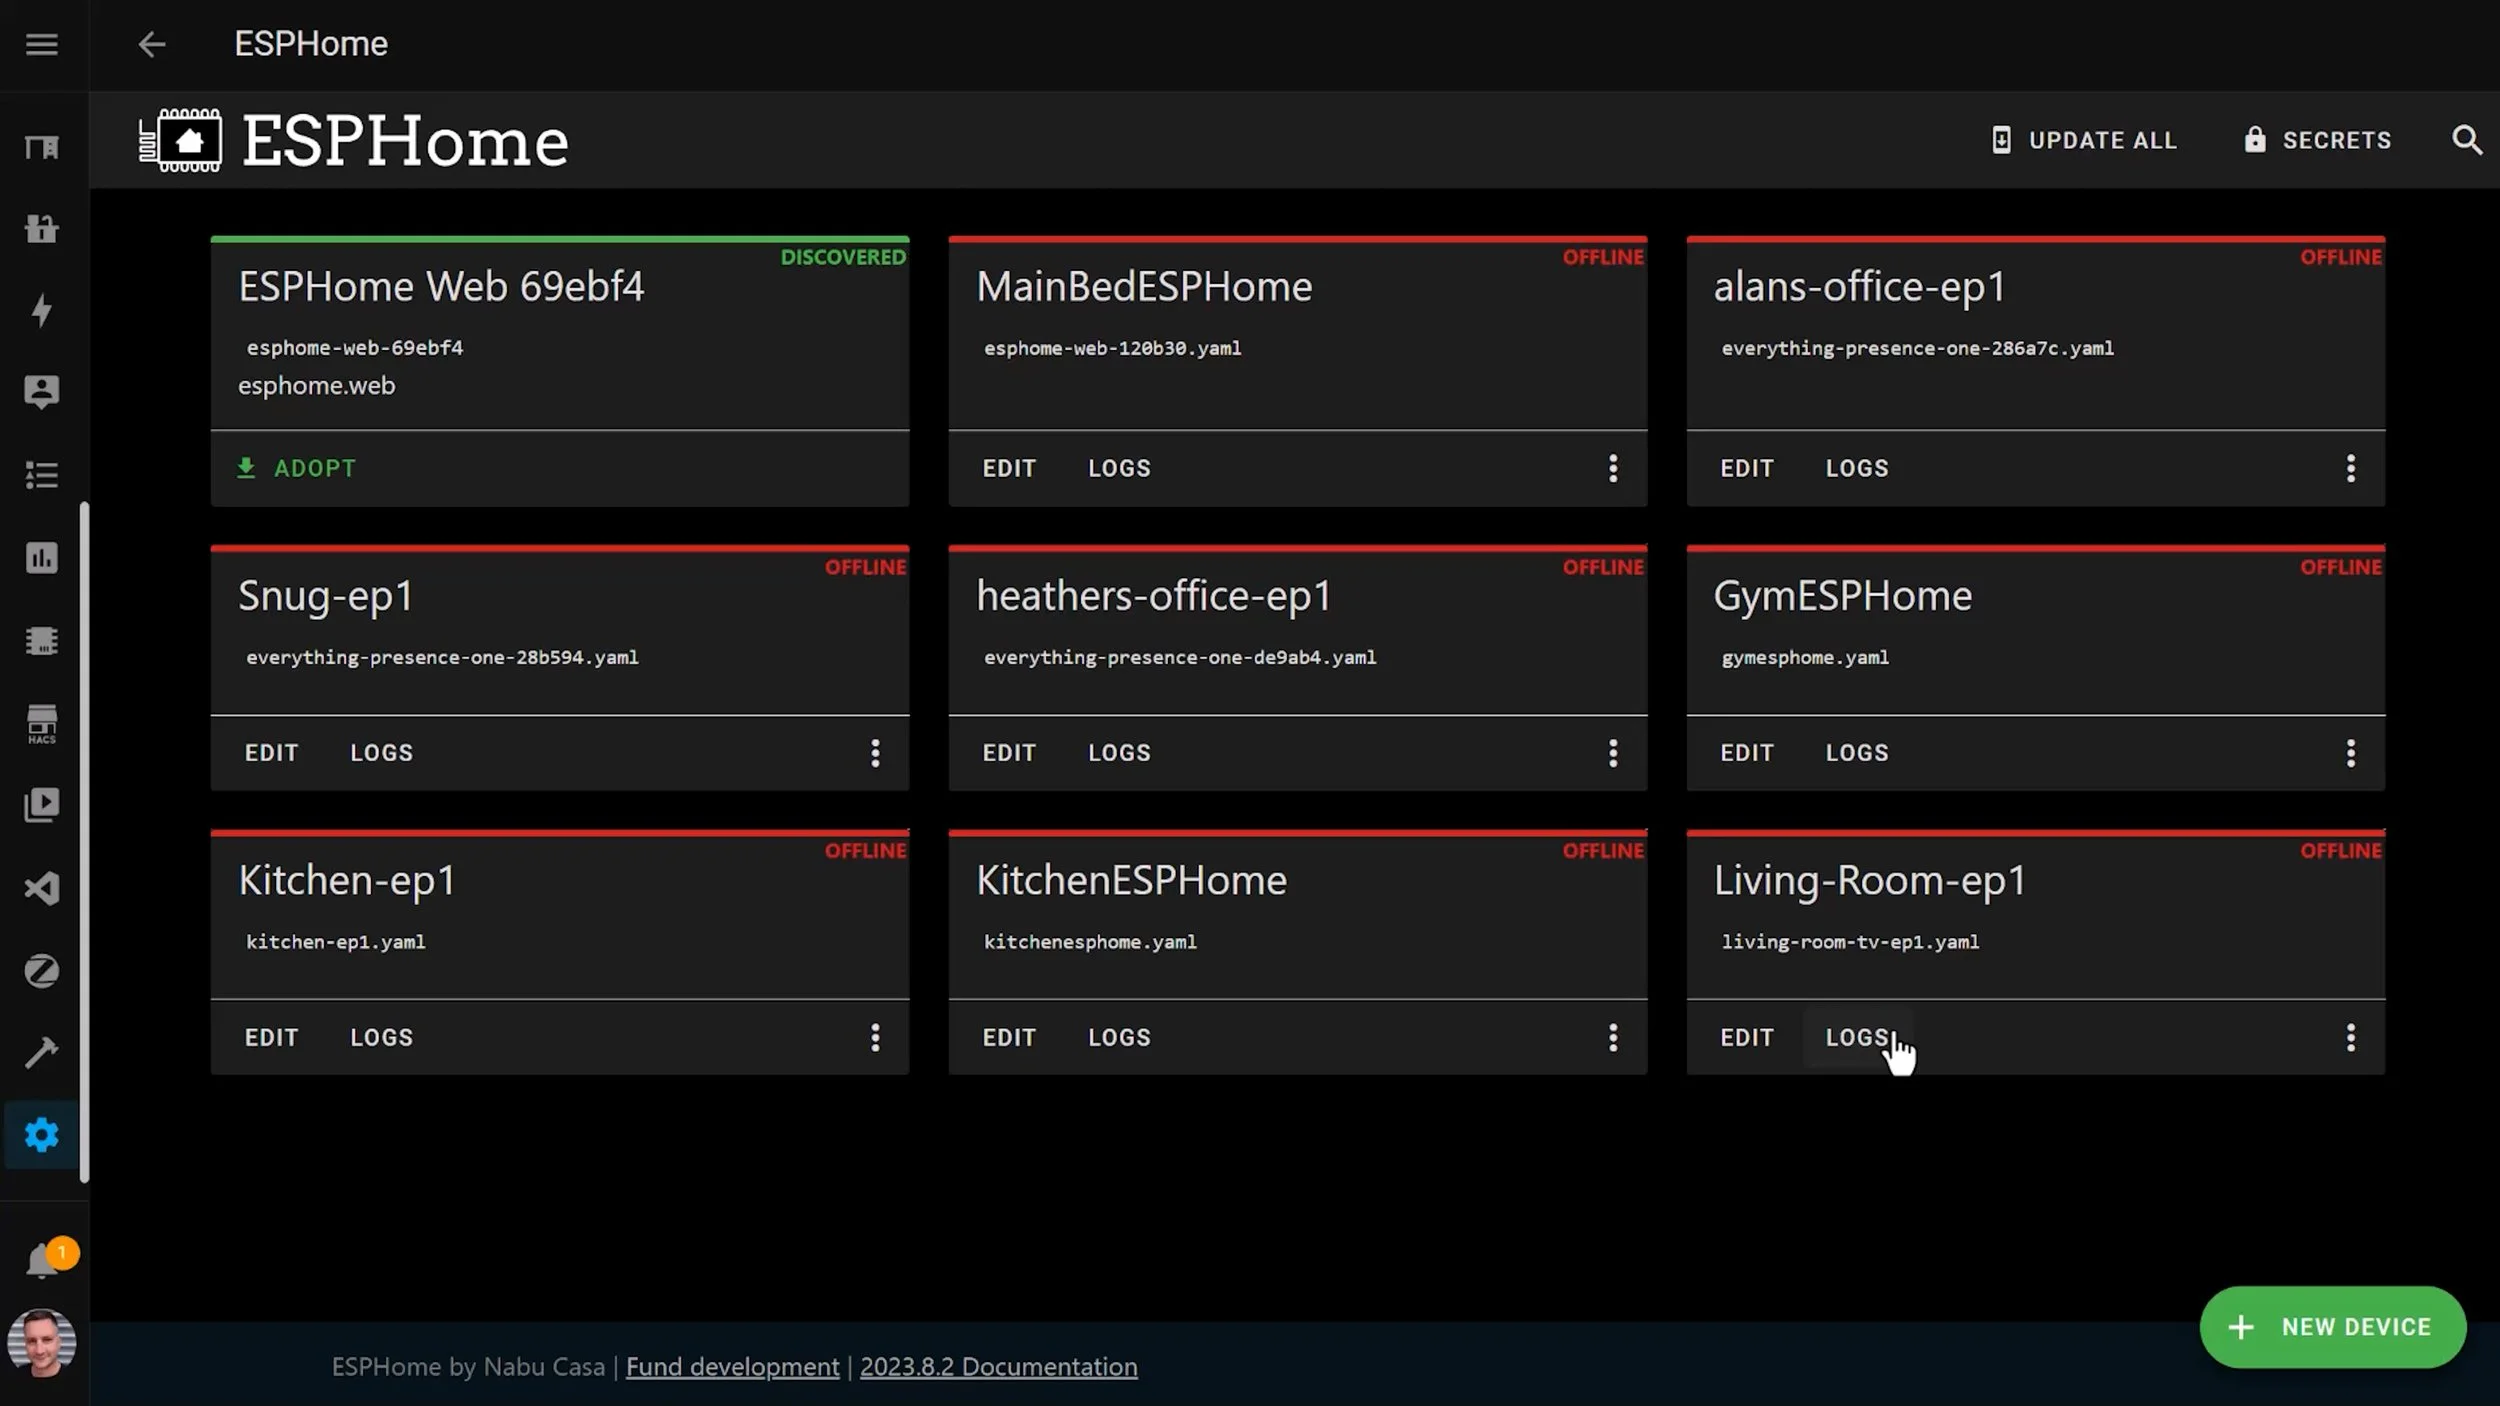
Click the Adopt button, give the device a name, and click Install. This will make it yours and install the default configuration on it for your Home Assistant.
You can now start programming the device by adding some configuration to it!
Configuring the ESPHome device as a bed sensor
You can now click Edit on that device’s card, which should bring up the default configuration for it.

Scroll to the bottom of the configuration, and add the following lines under the captive_portal: area.
binary_sensor: - platform: gpio pin: number: 13 inverted: true mode: input: true pullup: true name: Bed Occupancy Sensor device_class: occupancy filters: - delayed_on: 5s - delayed_off: 30sThis creates a new binary sensor using the Pin 13 GPIO port. If you used a different pin for yours, then you will need to change this value here.
The inverted, input and pullup attributes tell ESPHome that you are using a switch that is ON when closed. I’m not 100% familiar with the specifics of this as I’m still learning, but it is all documented right here on the ESPHome documentation page.
The name attribute should be pretty obvious, it’s the name that you have given your sensor and what will be listed in Home Assistant.
The device class tells Home Assistant that this is an occupancy sensor. You can make contact sensors, motion sensors, leak sensors, any number of things really.
Finally, the filters helped me make these sensors more accurate and useful.
The delayed_on attribute means that the sensor won’t trigger as ON until pressure has been applied to the mat for at least 5 seconds. The delayed_off attribute means that the sensor won’t be triggered as OFF until someone has gotten out of bed for at least 30 seconds.
Without these values I saw the sensor flip flopping between on and off all night as I rolled around in the bed asleep, and adding the values made it much more consistent and accurate.
Now click Save and Install in the top right of that screen to push these new sensor changes to the ESP device over the Wifi.
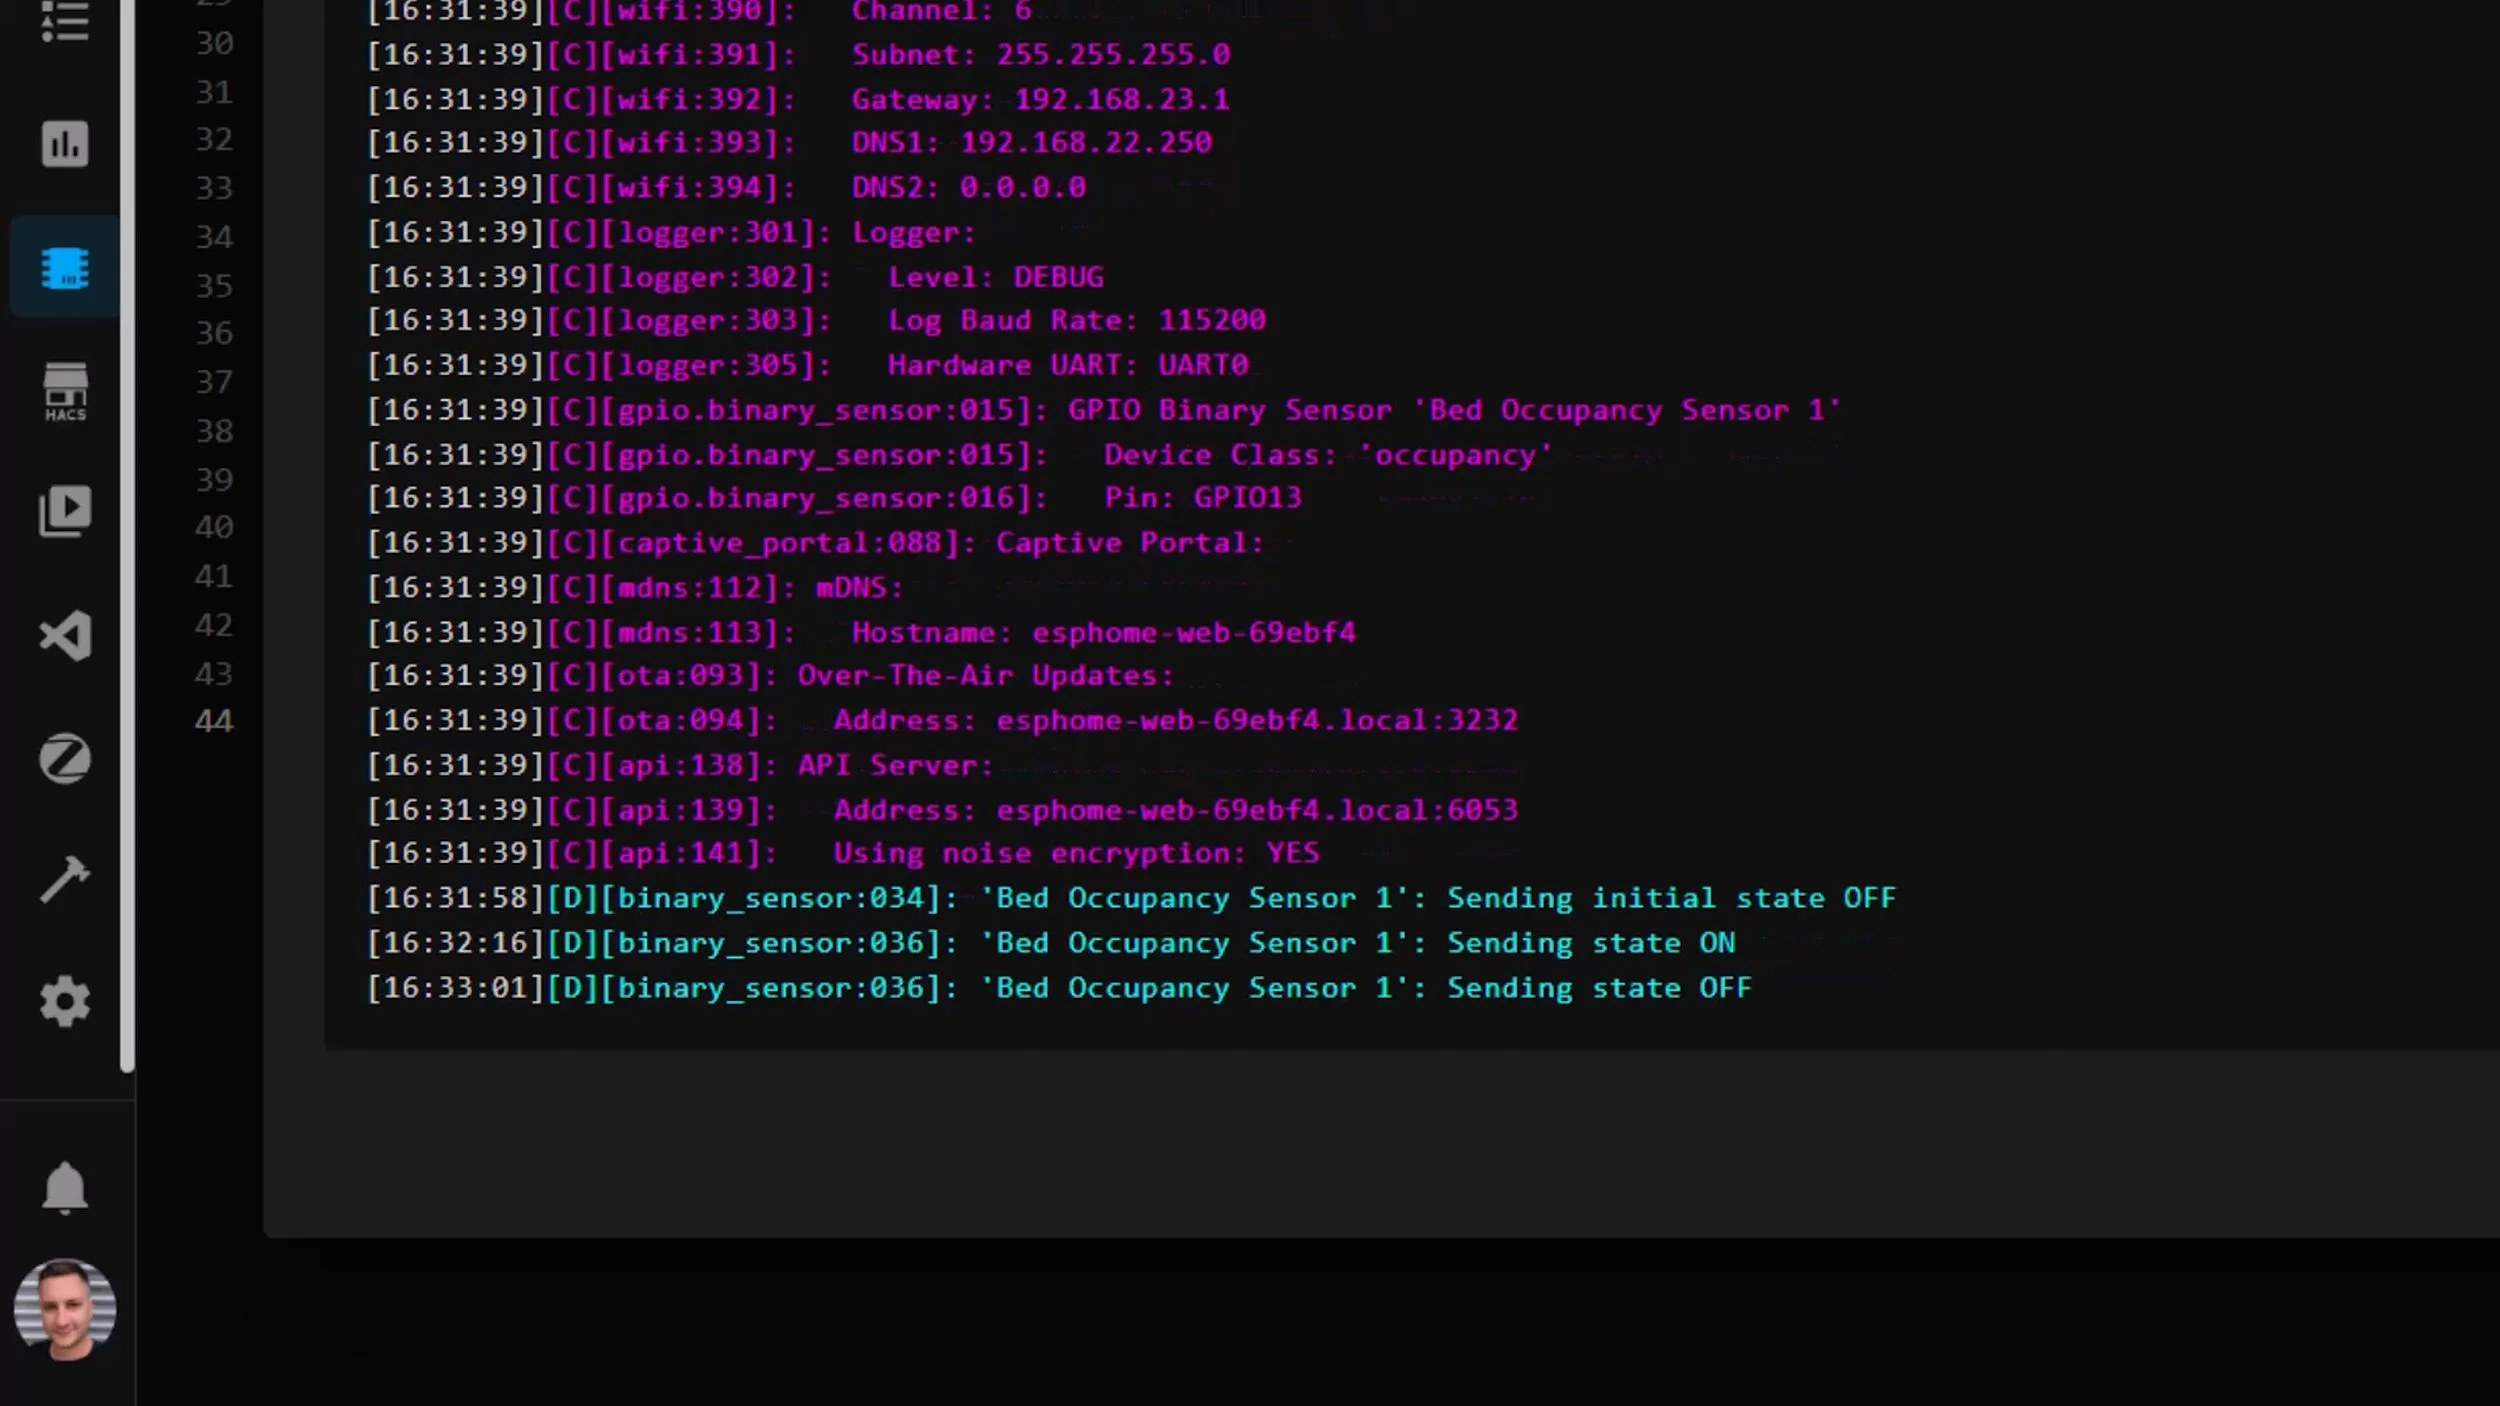
Once it’s done you should see in the logs screen that the sensor is online and ready. If we now push down on the mat for more than 5 seconds, you should see the binary sensor flipping to ON in the logs.
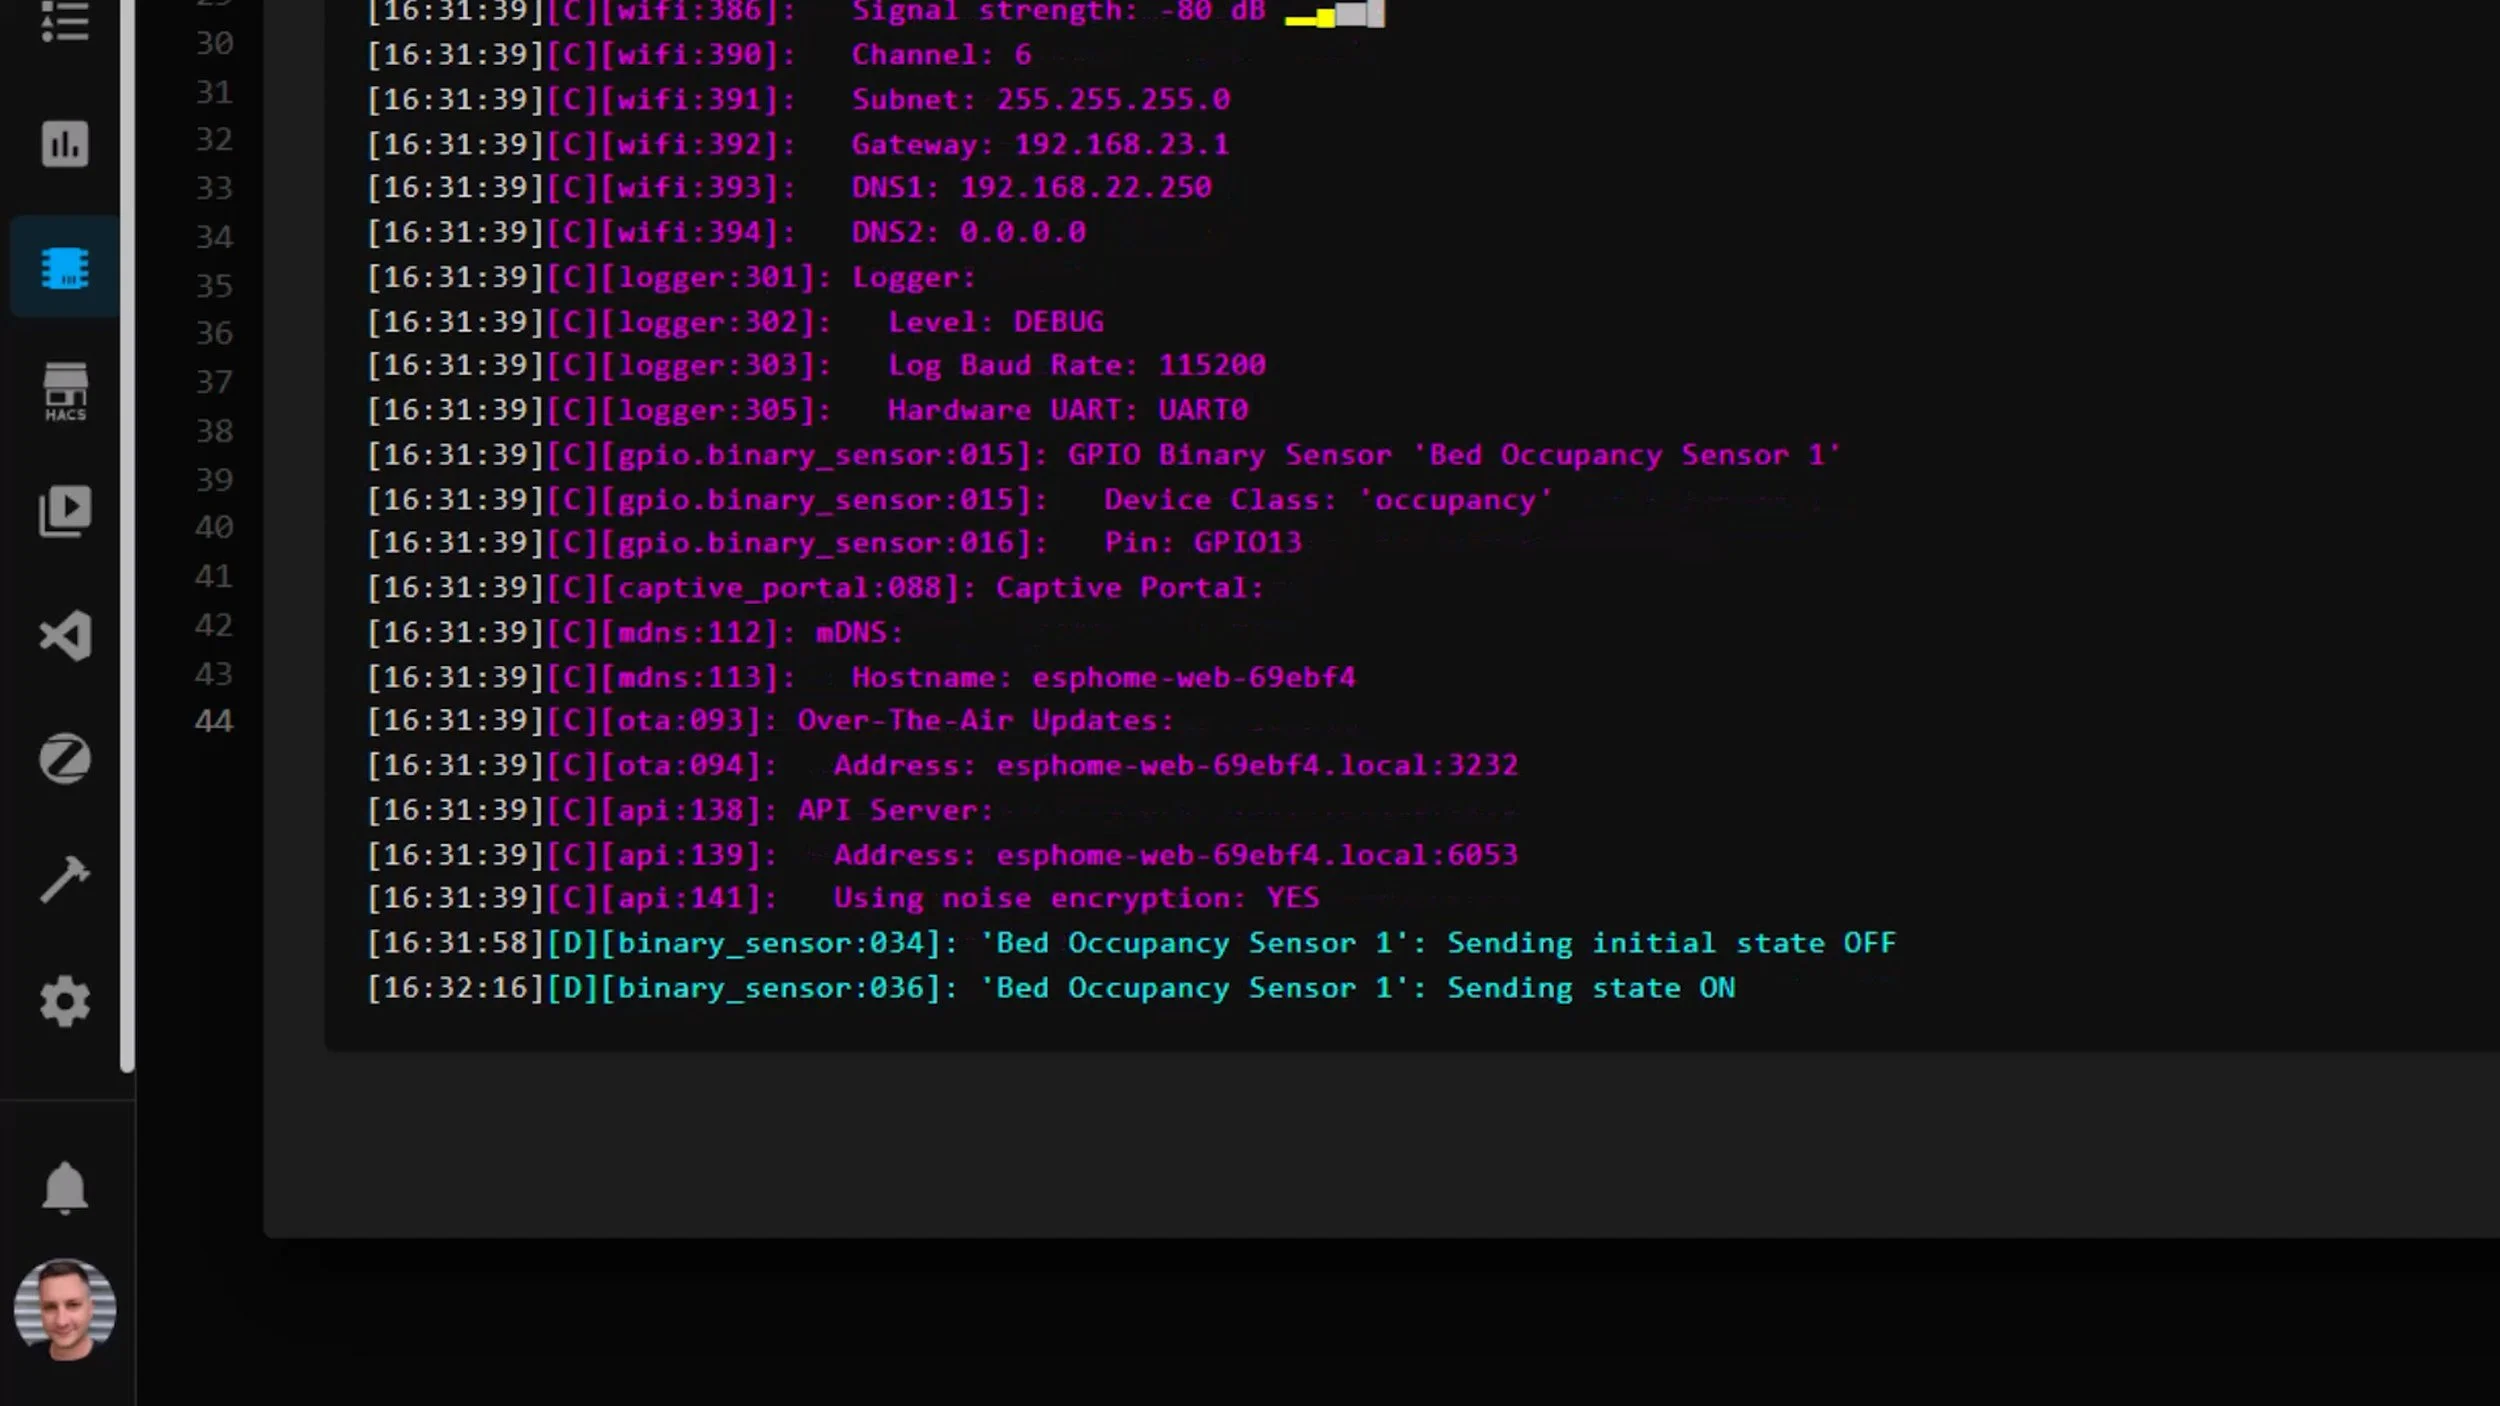
When you then lift off the sensor for more than 30 seconds, the logs should reflect this by telling you the sensor is OFF.
This sensor should also now have been autodiscovered in your integrations section, and if you add it to Home Assistant you should see these same states update in that entity when you press down and release the pad for the required time.
Congratulations! You’ve built an ESPHome Bed Sensor!
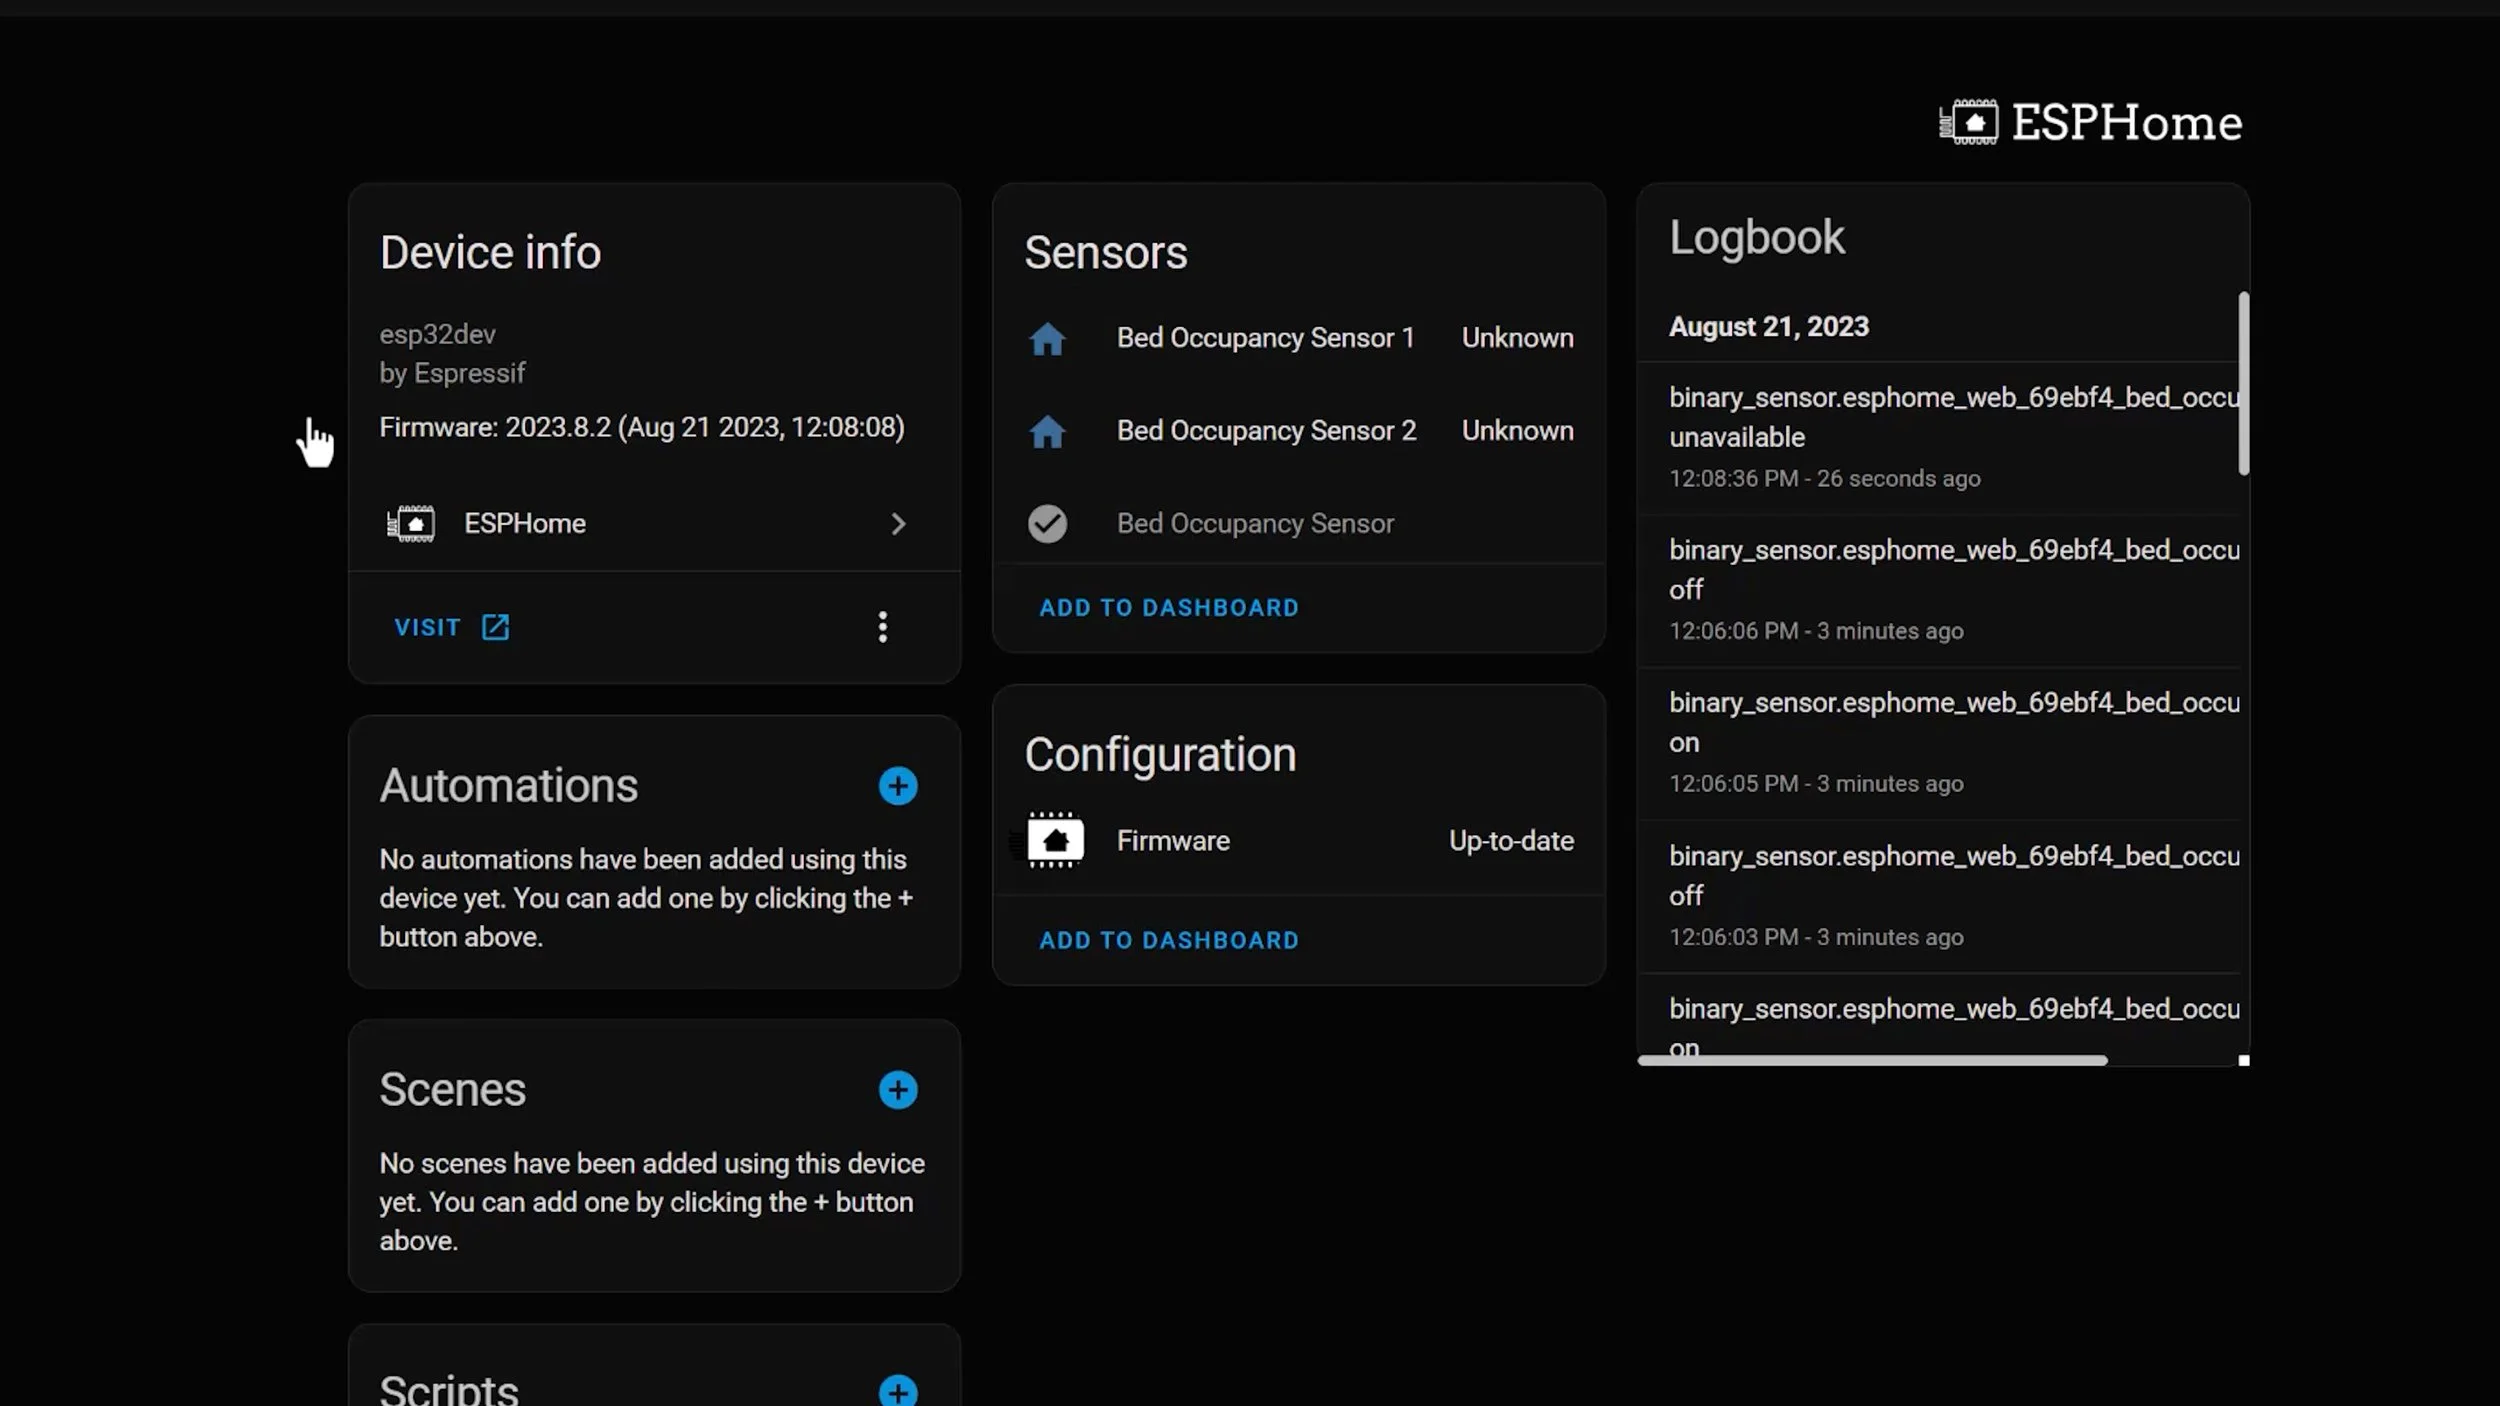
The best part about using these ESP devices is that you can now connect a second pressure sensor to the same GND port, and the other wire to GPIO port 12, and create a two zone bed sensor - one for each side of the bed. Just go to the ESPHome control panel, edit the config of that device, and copy and paste the configuration from the first sensor and paste it below. You’ll need to give them both unique names, and modify the config to make sure you’re using the correct pins, but everything else should be the same.

Save and re-install this configuration and you should see two bed sensors entities inside that ESPDevice in Home Assistant.
Combining two bed sensors into one
In my house I’m using two pads connected into the same ESP device to create two independent bed sensors in Home Assistant. My partner and I have our own sides of the bed that we sleep on each night, and I combine these two bed sensors into two more sensors for use in my automations. This same theory can be used if you create two independent bed sensors out of two Aqara leak detectors.
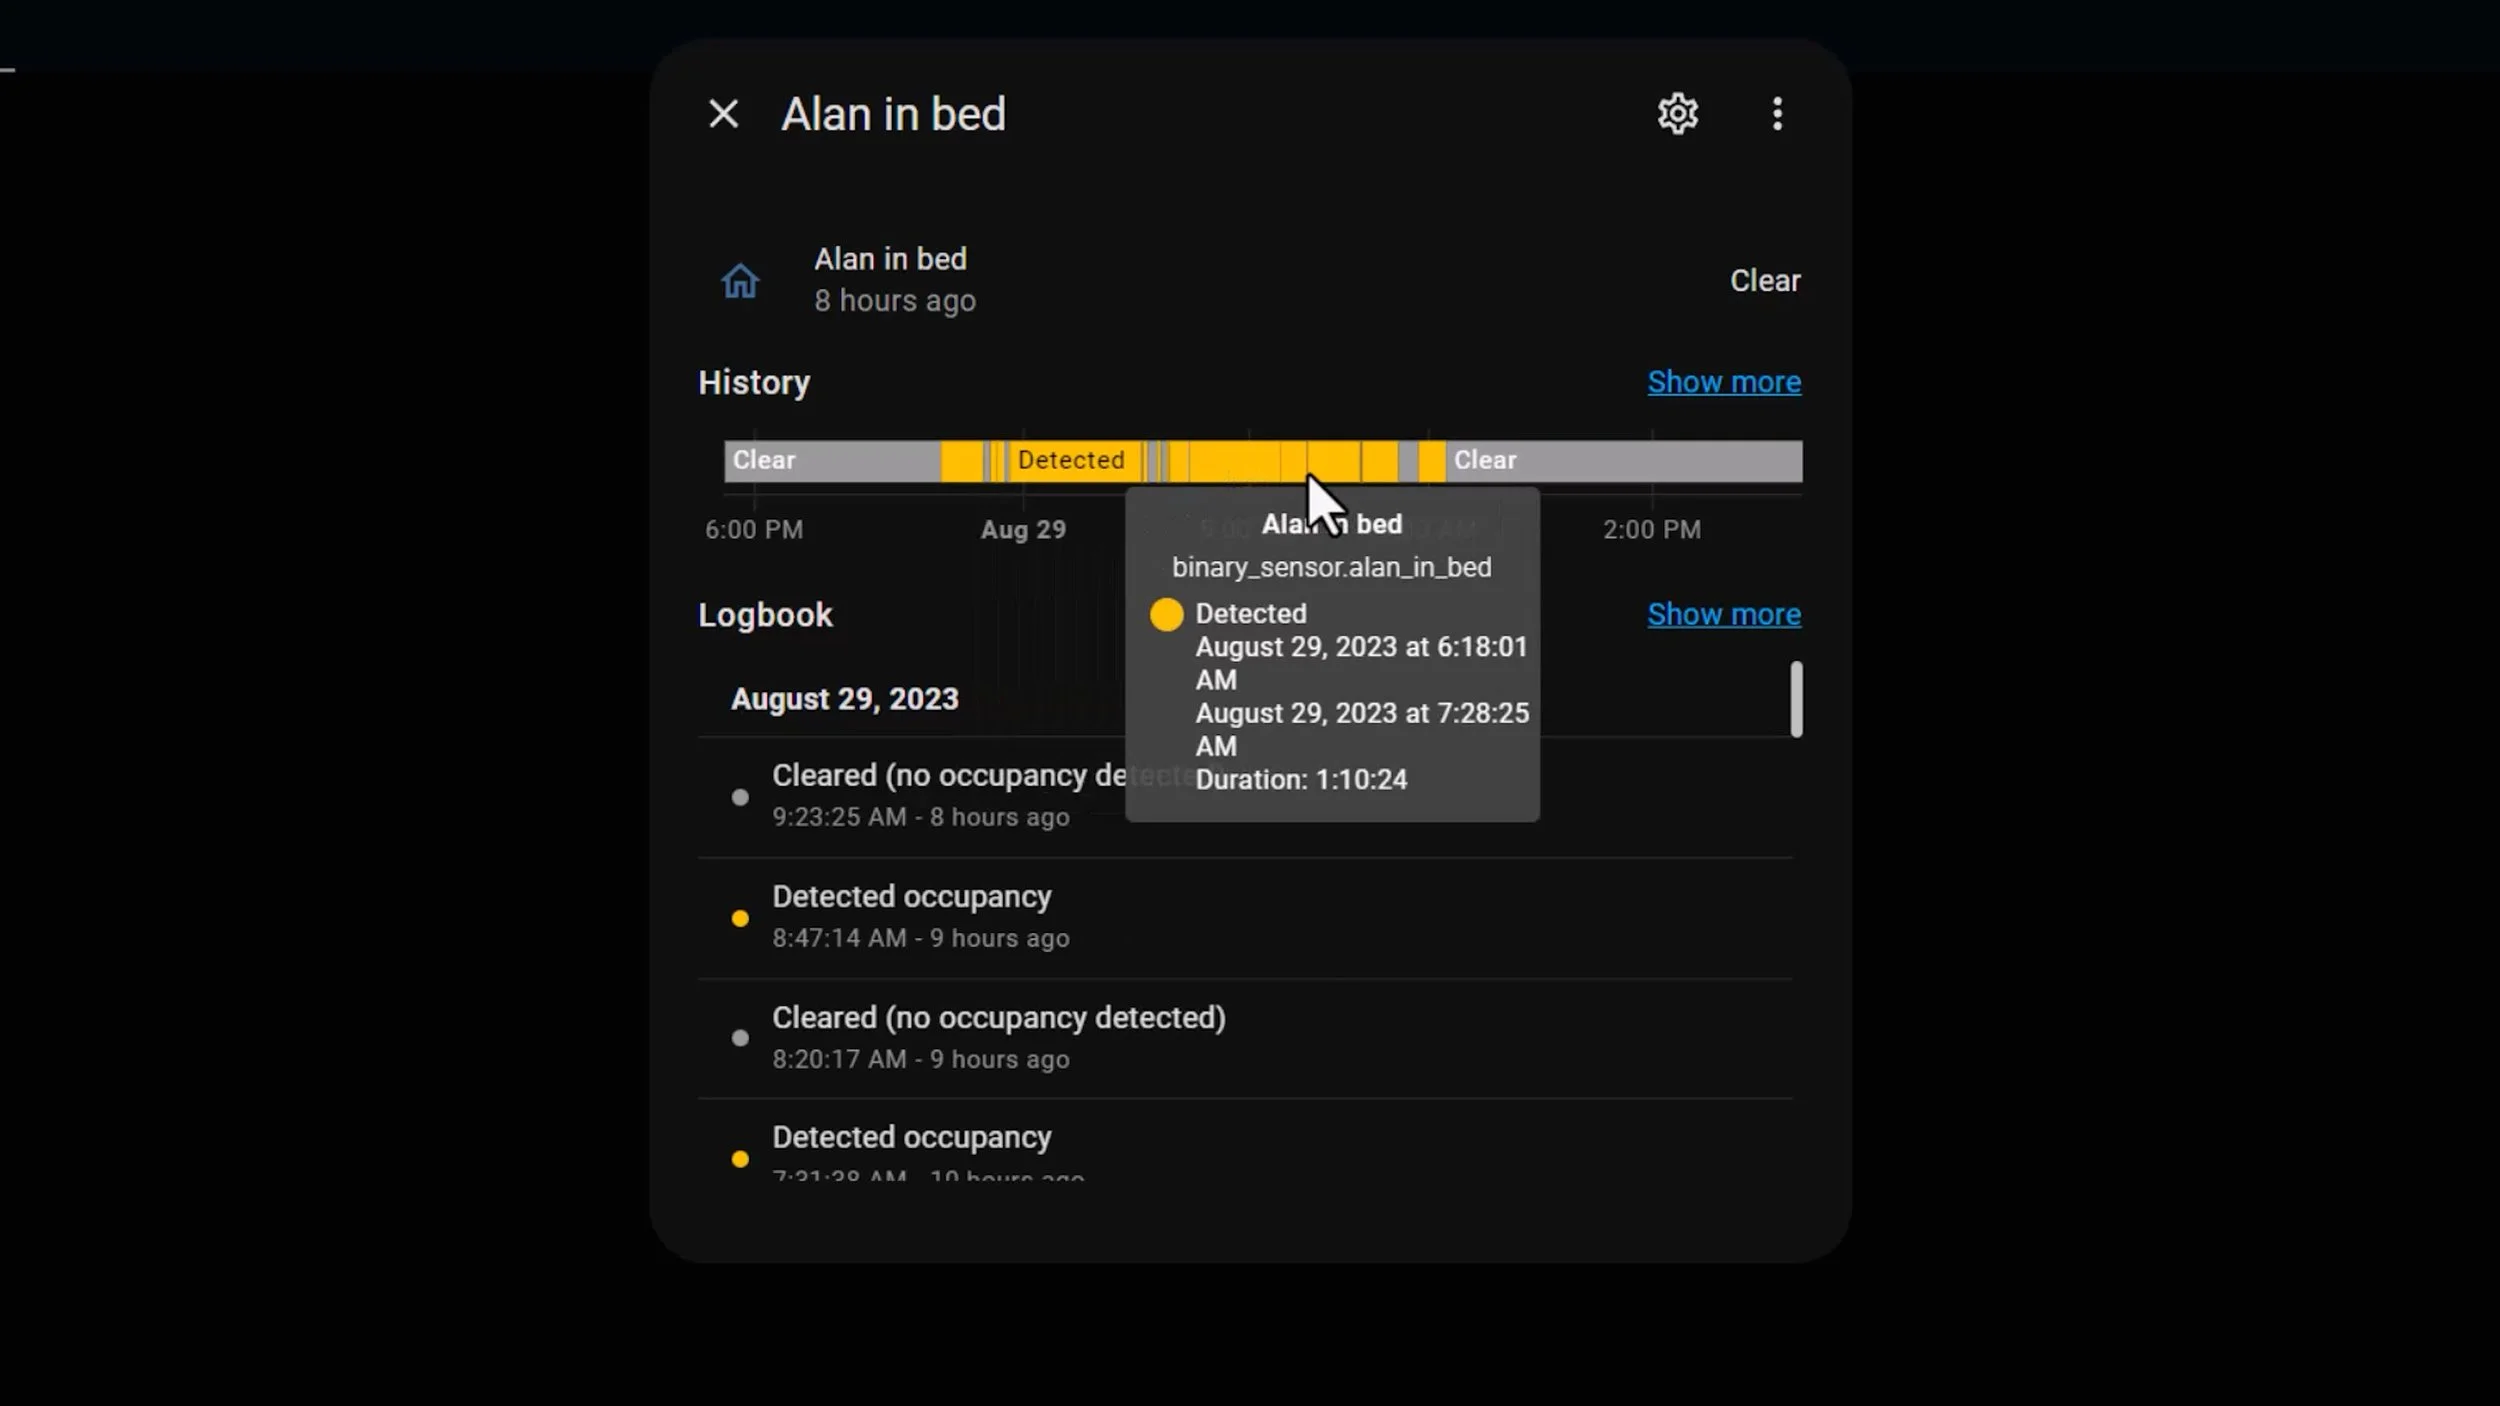
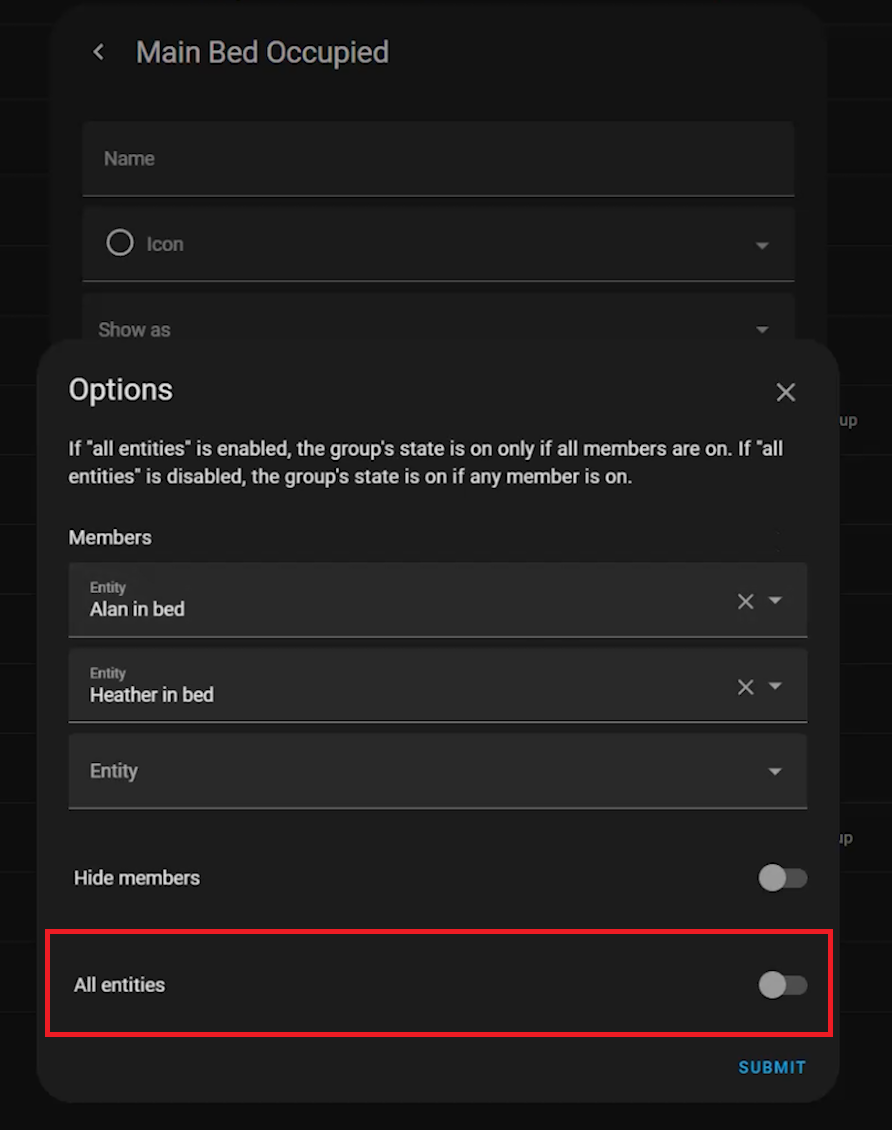
One sensor is called Main Bed Occupied and the other is Both in Bed.
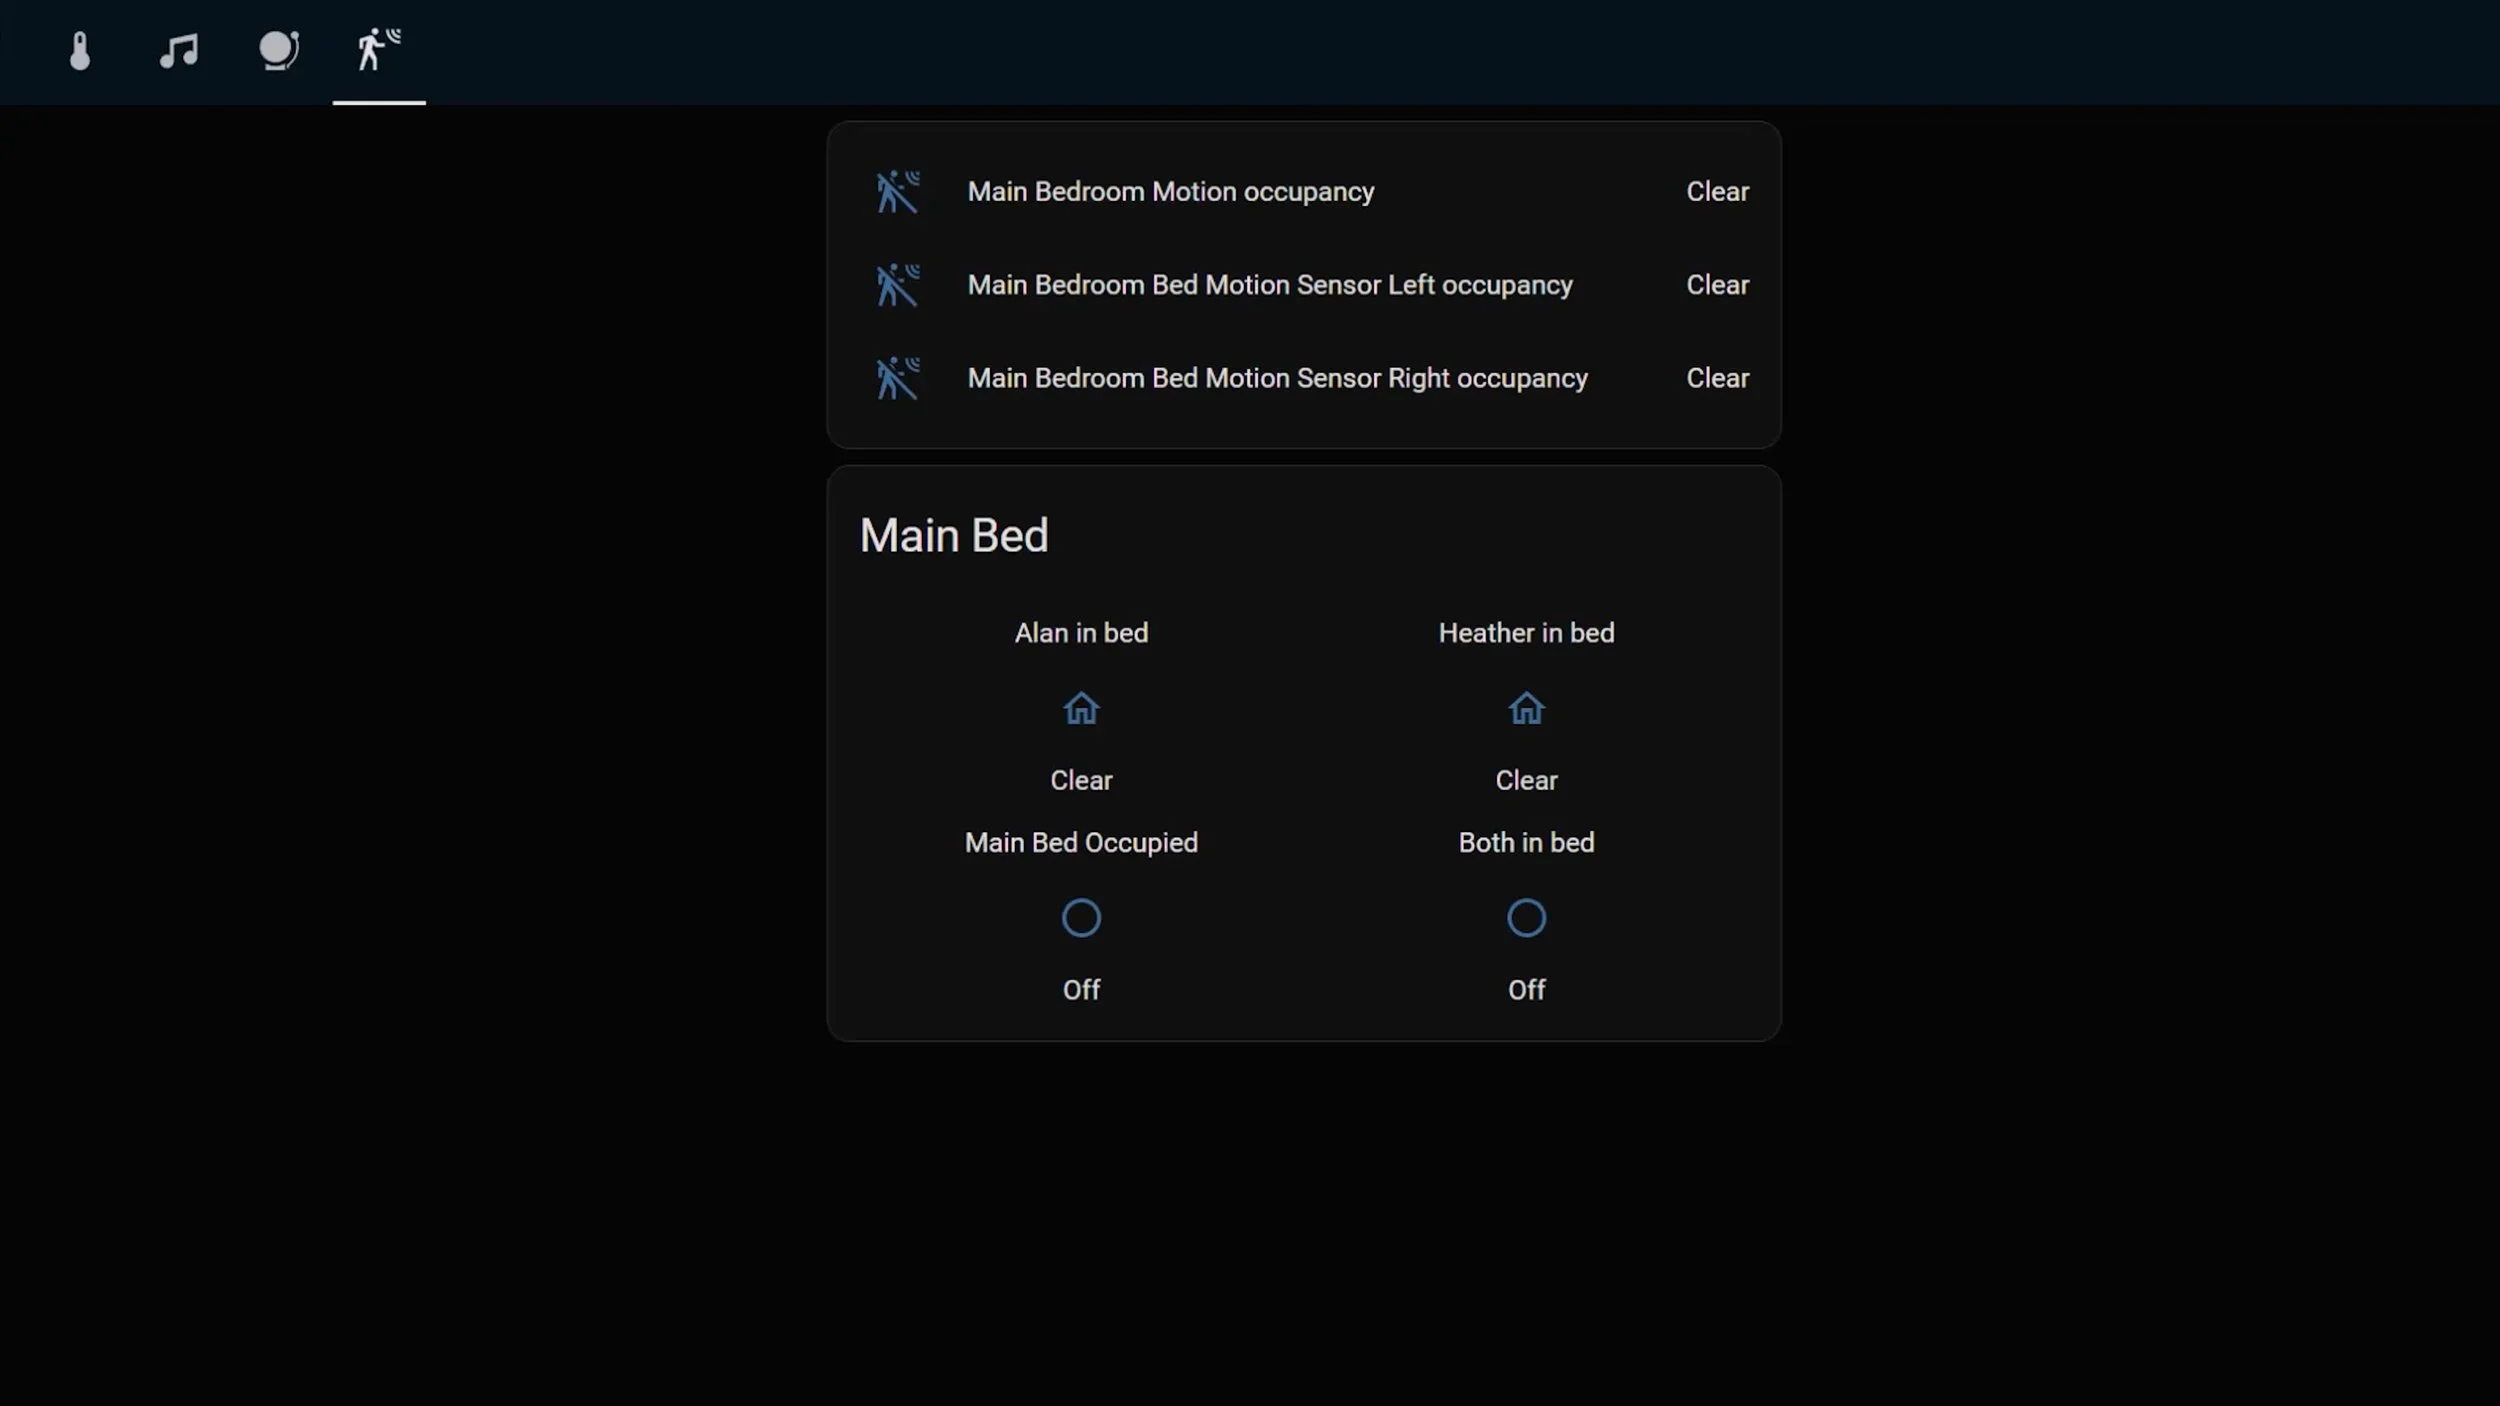
The Main Bed Occupied sensor tells Home Assistant if SOMEONE is in bed. I use this in certain automations, for example as a condition in my Automated Lights automation to make sure that the ceiling lights don’t turn on when someone is having a sleep.
This is a Home Assistant binary sensor group helper that has both my bed sensors as group members. I then make sure that the All Entities toggle at the bottom is OFF. This will make the sensor turn ON if any ONE of the bed sensors turns to ON.
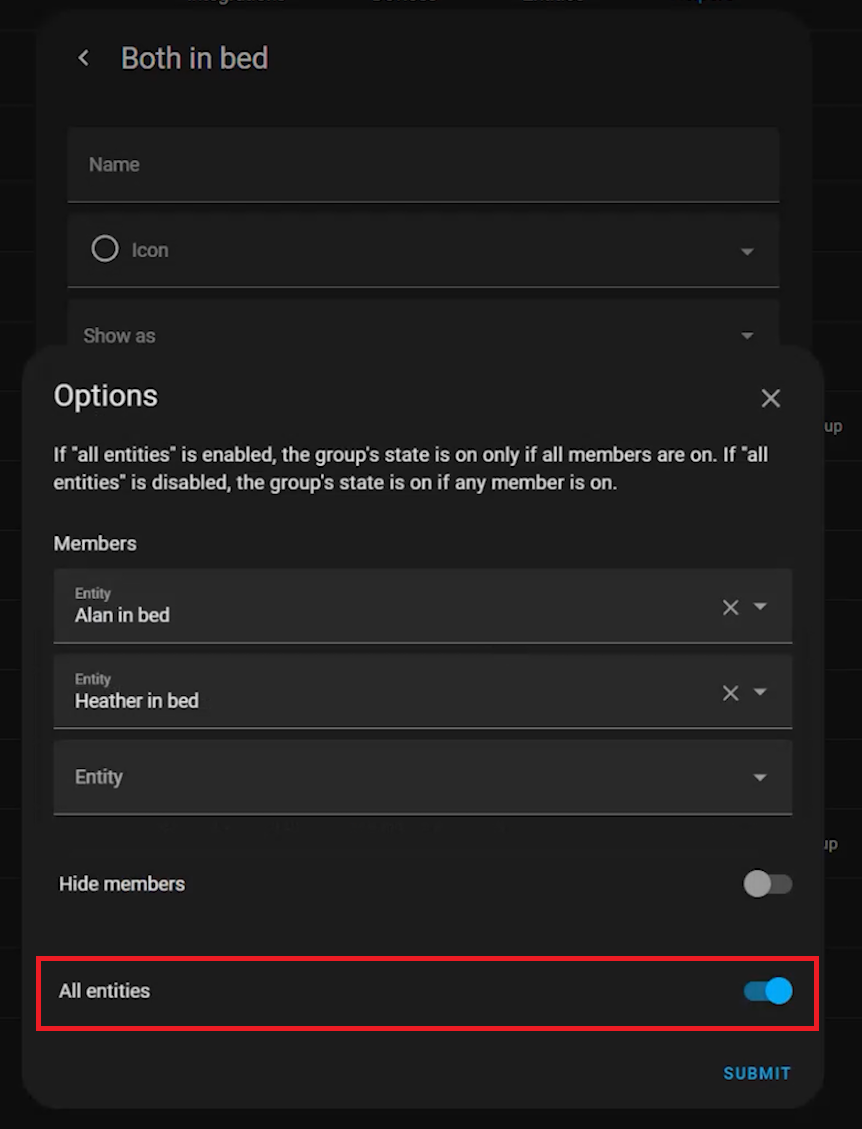
The Both in Bed sensor is turned on when both bed sensors are triggered. This is usually because we’ve both gone to bed in the evening. I use this sensor to automatically turn on Night Mode for our house, which powers down all my smart plugs, sonos devices, our work desks, the TV cabinet, and it arms our home alarm into Night mode
This is also a Home Assistant Group sensor, and is almost identical to the previous one - with one exception - the All Entities Toggle is set to ON. This means that ALL the bed sensors need to be triggered to on before the helper group gets set to ON.